¶ My Blocks
add a command block

This block is actually a button. It initiates the process of creating a custom block (function).
Both this button and the next in this category does not have an Example tab and corresponding downloads. Instead, the tabs provide detailed descriptions of how to use these processes to create other blocks.
Creation of a custom block is a detailed process with many steps and options:
- Assigning a custom block name
- Adding parameters and their labels
- Changing the types of the parameters
- Assigning default values to parameters
- Color values
Before we examine the process of making a new custom block, let's review some of the common operations available while working with a custom block header:
EDIT MODE
When the purple "define" hat block part or the light blue block part of the custom block is clicked, it enters the editing mode. This mode can be identified by the change in the looks of the parameters of the header, as well as by the appearances of the white triangles.
Custom Block - Normal View:

Custom Block - Edit View:

Successively clicking the "define" hat block area will safely enter and exit the edit mode.
Sometimes, clicking the white triangles, a parameter or the light blue block area results in a floating parameter block or a floating custom block image. This usually happens when the mouse is slightly moved while clicking. The resulting blocks can safely be discarded by dragging them to the block menu area. Alternatively, these extra block images can be right-clicked and then deleted by selecting "delete block".

ADDING PARAMETERS AND LABELS
This is accomplished by clicking on the sideways white triangles on the blue header block. When the right black triangle after the block name is clicked, a parameter with name "foo" will be added. It will have the defaut value 10.
When the black triangle after the parameter is clicked again, a small window with two options is opened: label and input.
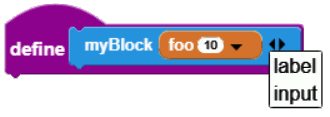
Selecting "input" will result in another parameter being added. Selecting "label" will add a label field.
When a parameter is added, MicroBlocks assigns a default name (foo, bar, etc) and a default type (number/string) to it. Each additional parameter will get a different name.
When a label is added, MicroBlocks assigns a default name (label).
DELETING PARAMETERS AND LABELS
Just as the right white triangles are used to add parameters and labels, the left ones are used to delete them. Clicking on one will delete the rightmost item (whether it's a parameter or label).
If a label in the middle of the block header needs to be deleted, simply double-click to select it, and then press the delete key.
To delete a parameter in the middle of a header, right click it and select "delete block" from the menu.
RENAMING PARAMETERS AND LABELS
To rename a Custom Block name label or any label on the header, simply double-click to select it, and then type in a new name. Since the block name and the labels are just text fields, it is possible to create names with multiple words separated by spaces or underline characters.
If spaces are used when creating the label name, the resulting label name will be treated as successive separate labels. Even though they are listed one after another and perceived as one continuous name, in fact they are individual text labels. This is only important if you are going to edit them later on. You will notice that each one needs to be edited or deleted separately.
If underline characters are used when creating the label name, the resulting label name will be treated as a single label.

Therefore, depending on what your intentions are, you might find one method or the other more suitable to your needs.
To rename a parameter, click the brown oval parameter area, and type in a new name into the editing window.

DISPLAYING THE CONTENT OF A CUSTOM BLOCK
Once you create a custom block and close its header and definition, it will automatically be placed into the Blocks Palette area of the My Blocks category. As the newly created block resides in the My Blocks area, it will be seen as the control or reporter block format of its definition. To actually see the blocks that make up the custom block definition, you need to R-Click on the block in the My Blocks area and select show block definition from the menu.
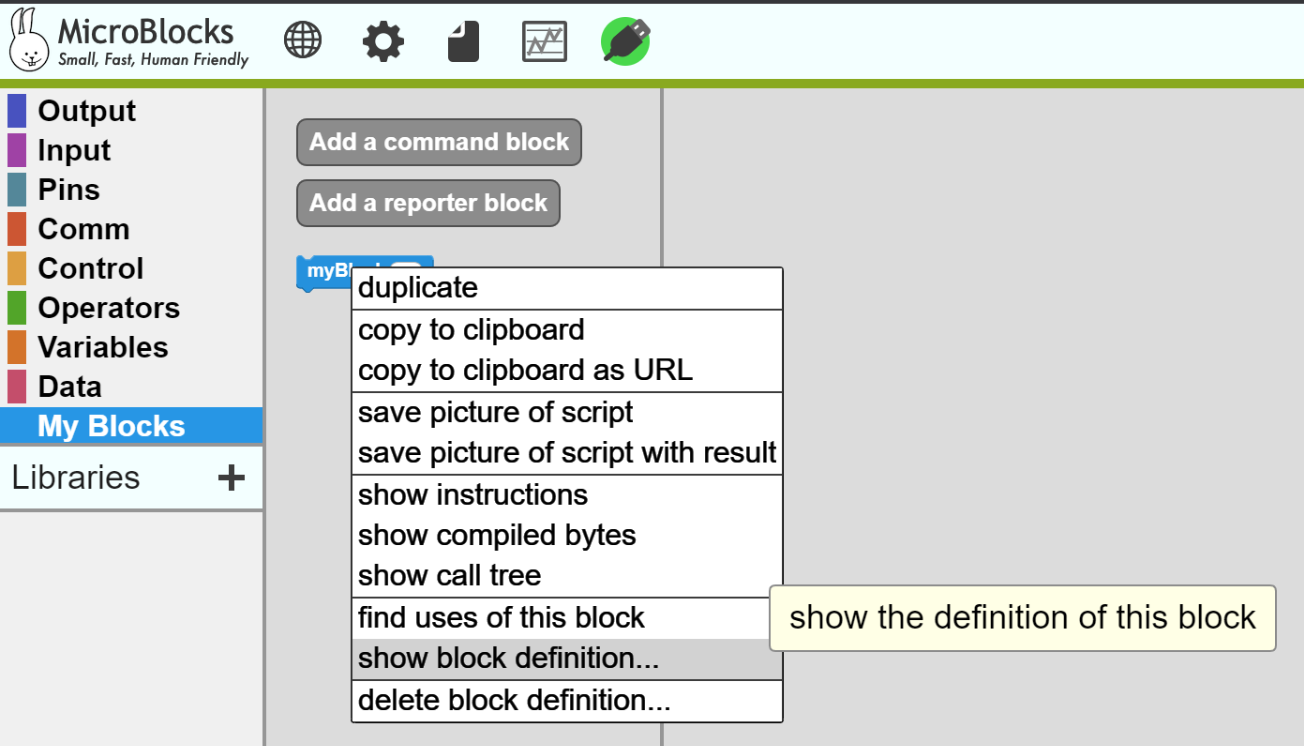
Selecting this option will make the custom block definition appear in the Scripting Area.
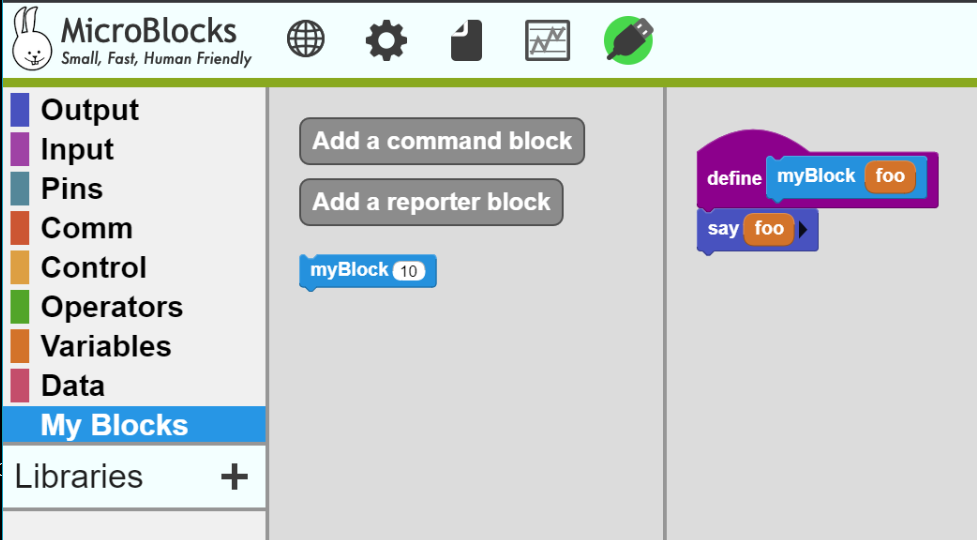
When you want to no longer display the definition of your custom block, you can simply move the script to the Blocks Palette Area. For my Blocks definitions, moving the definition script to this area WILL NOT DELETE it, but just hide it.
To actually delete the definition of the custom block, you need to select the menu option delete block definition.
¶ Assigning a custom block name
When the ADD A CUSTOM BLOCK button is clicked, it opens a dialog where the custom block name is typed in.
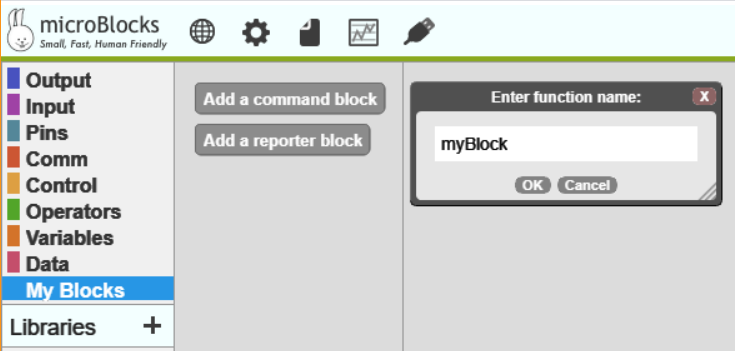
After the OK button is clicked, a custom block definition header is placed on the programming area.
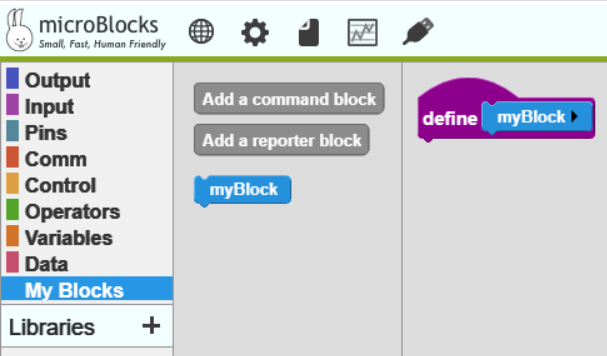
Now all the code blocks that will make up this custom block can be placed under the header block, and they will be part of the new function programmed. Also note that a new block representing the custom function has been placed into the My Blocks category window with a default name of myBlock. The default name can be changed. Refer to Common Operations.
Adding parameters and their labels
While not always a requirement, some functions will need parameters to complete their programmed functionality. These will act as inputs to the function, and can be used by the blocks that make up the custom block code.
To add parameters, text labels for the parameters, and how to edit them, refer to the Common Operations.
Changing the types of the parameters
When a parameter is added, MicroBlocks assigns a default name (foo, bar, etc) and a default type (number/string) to it.
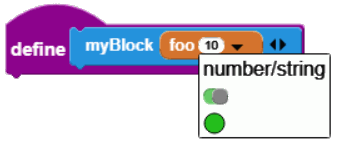
There are five types of parameters possible: number/string, number, string, boolean, and color. These are available as three selections in the menu that opens up when the small downward black triangle on the brown oval parameter block is clicked.
Here is a sample custom block definition with all parameter types used and default labels changed:

Here is the custom block view with the resulting display it produces:

NOTE that the function name looks like myBlock String. In fact, the function name is myBlock. String is the name of the first parameter. However, since the MicroBlocks does not normally allow the entry of a label followed by a label, it was necessary to create the parameter myName first, followed by double-click of the function name myBlock and adding " String" (space String) to the end of it.
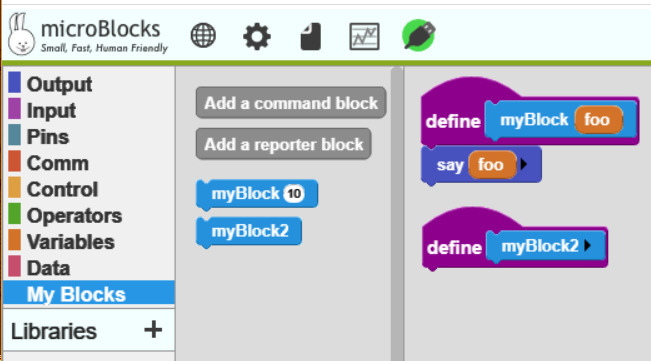
This technique seems strange, but is totally OK since the function names are never used specifically on their own as in a text-based programming language. Custom blocks, just like all the other ones, are dragged and dropped to the programming area, regardless of their name. Nevertheless, you must not create multiple custom blocks where the first label name is identical. As a matter of fact, you will NOT be able to, as MicroBlocks will assign a numbered name and make it unique.
Here is what it will look like if another myBlock custom block creation is attempted:
Assigning default values to parameters
As you can see in the above custom block definition pictures, the final block view has values shown for each parameter, "some text", 10, boolean True, and 255 for color blue. These are called default values. They can be assigned to the parameters by simply entering them while creating the definition of the custom block. You have to be in the edit mode to be able to do this. See Common Operations.
Color Values
The default value settings for string, number, and boolean types are pretty self-explanatory. However, the color type needs some explanation.
For parameters of type color, the default color green value is displayed as 2342430. Let's dissect this value and see what it represents.

If the color green circle on a custom block is clicked, a color panel is displayed that shows the decimal values for the R=35, G=190, B=30 that make up this particular color green.
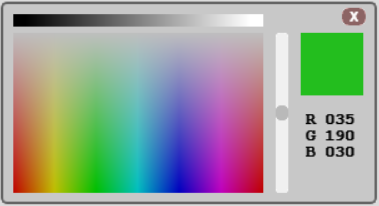
If each one of these decimal values is converted to the hex equivalents, one ends up with:
| Color | Dec | Hex | Color Value |
|---|---|---|---|
| Red Green Blue |
35 190 30 |
23 BE 1E |
 |
When these three hex numbers are placed in sequence of RGB next to each other, we get a hex number 0xFF00FF. And the hex number 0x23BE1E converted to decimal is 2342430.
add a reporter block

This block is a button. Initiates the process of creating a custom block (function) that can report back a result (see RETURN block in CONTROL category).
The main difference between this operation and the one above is in the fact that the custom block definition created here will have the ability to report back a value using the RETURN block.
This unique capability will allow the custom block to be used in any block where an input parameter is expected, and it will pass on the value it reports into that operation.
All other aspects of creating and editing a reporter type custom block is the same as the one above.
Regarding the use of the RETURN block:
Any blocks placed after it will not be executed.
In a script, there can be multiple RETURN Blocks, handling different conditions and returning respective values.


Referring to the script above, which is a custom block definition of REPORTER type, you will see that it reports back the value of the local string variable foo as "my FOO is very strong!", when executed. With minor changes to the variable type, it could also report a value of type number, boolean, or color.
While the value reported in the above example is of a local variable, one can also use a parameter for the block definition and operate on that and report a resulting value. This option is shown below:


The example above is the same block definition but with a boolean parameter. The block returns a result based on the value of the boolean: true or false.
This oval version of my Blocks can be used in any block where an input parameter is expected.
As mentioned above in the info section, the say block at the end of the script definition will never get executed, because once a return is encountered, the script exits.
