¶ Control
when started

Hat blocks are in a group of control blocks that start running when the START icon ![]() is clicked. These hat blocks monitor various conditions depicted in their captions. This particular one activates when the program start condition comes true. Others check for button status or boolean conditions to come true, before executing blocks placed under them.
is clicked. These hat blocks monitor various conditions depicted in their captions. This particular one activates when the program start condition comes true. Others check for button status or boolean conditions to come true, before executing blocks placed under them.
Simple example for detecting a program start condition.

when button pressed

This hat block monitors the state of the micro device buttons, and runs the code placed under it when one of the device's buttons are pressed.
It triggers once for each button press. If you press and hold the button, it doesn't re-trigger until you release the button and press it again.
Note: not all micro devices have buttons. Your code might not run correctly depending on the target device.
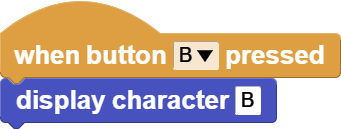
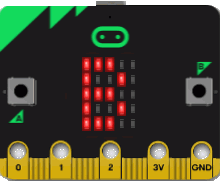
The state of button B is monitored, and when pressed, the letter B is displayed on the LED panel.
forever

C-blocks are in a group of control blocks that run the code placed inside them as long as the conditions depicted in their captions are true. They are also referred to as LOOP blocks. This particular one will execute the blocks within forever. Commonly used to graph values or continuously monitor port values etc.
repeat

This C-block executes the code placed inside it specified number of times.
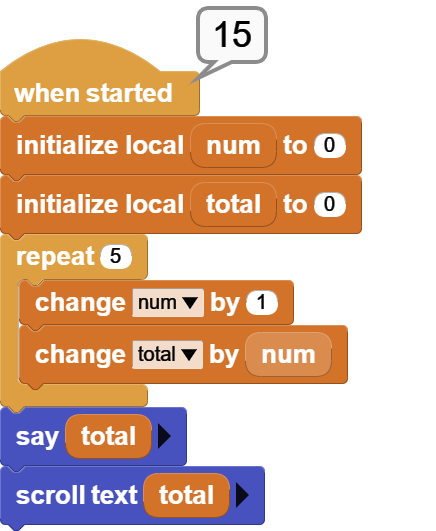
The program calculates the total of the first 5 numbers by looping 5 times. At each repetition, the variable num is incremented by 1 and added to the variable total. At the end, total stores the result of 1+2+3+4+5 = 15. Total is displayed using SAY and SCROLL blocks.
wait millisecs

This block pauses the executing stream specified number of milliseconds. It is used to pause and resume execution of code in a controlled manner.
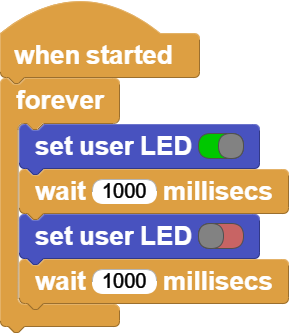
A 1000 millisecond (1sec) wait is used to blink the micro device LED on and off in 1 second intervals. Same program can be modified to operate at a higher resolution with wait microsecs block.
if
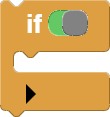
The IF block checks the boolean condition and executes the blocks within one time if the boolean condition evaluates to true. The black triangle allows the expansion of the IF block with multiple ELSE IF conditions added. In case the previous IF or the ELSE IF branches are not true, then each one of the following ELSE IF's are successively evaluated and executed,
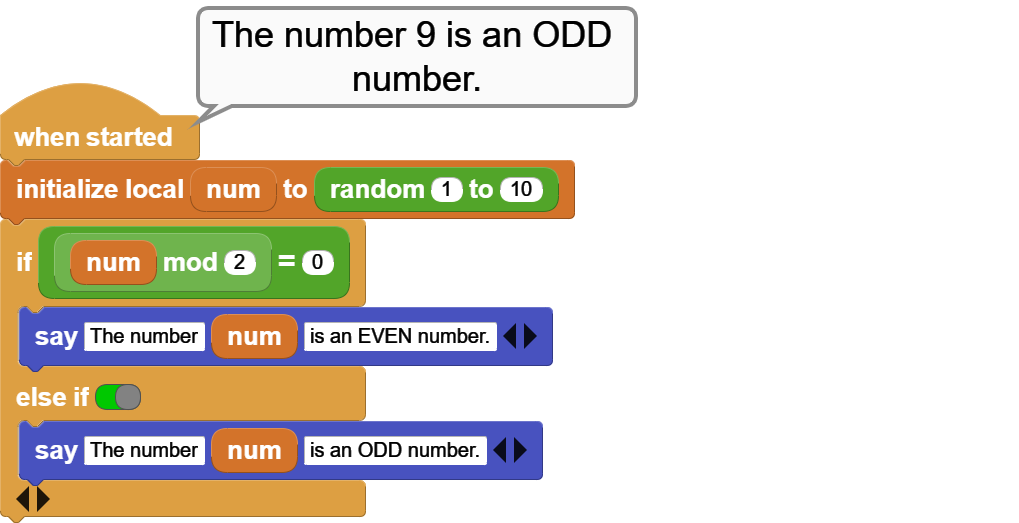
The variable num is assigned a random number 1-10. The MOD operation is used to probe the odd/even status of the number. If the remainder of the operation num divided by 2 results in 0, the number is even, else it is odd.
when

When the WHEN hat-block is running, it repeately checks a boolean condition. When the condition becomes true, the blocks under the hat are run. If the condition is still true at the end of execution, then the blocks will be run again, and that process repeats until the condition becomes false.
Note: The WHEN hat includes a 10 millisecond wait between cycles. This is helpful for debounding noisy inputs (e.g. buttons) but limits performance to a maximum of 100 iterations/second. To handle higher speed events, use a an IF statement inside a FOREVER loop.
The same example as in the IF block is programmed here using the WHEN block. The boolean conditions are set to the MOD operation results. All three hat blocks (WHEN STARTED, 1st and 2nd WHEN) start running simultaneously when the START icon is clicked. The FOREVER block under the WHEN STARTED block keeps generating random numbers. And both WHEN blocks execute continously, evaluating their conditions and displaying the corresponding results.

wait until

This control block pauses the execution of the program and waits until the specified boolean condition becomes true. I can be used to synchronize parallel running code blocks, based on events monitored.
In this example, the environmental light level is monitored using the built-in light sensor of the micro device. The light sensor has a range of 0-255, 0 being dark and 255 being light.
When the RUN is clicked, both WHEN BUTTON PRESSED blocks start running and checking the button status.
Upon button A press, the light monitoring starts and program waits until the micro device sensors report a light level < 75. When that condition becomes true, an alert message to turn on the lights is issued.
Button B is programmed to turn off the monitoring process. When pressed, it stops the execution of that branch of the program.

return

The RETURN block is used to report back a value specified in its input area. This can be any data type. While it is possible to use the RETURN block anywhere in a program to display a value, similar to the SAY block, its correct and more common use is in a function (or reporter type custom block) to return a value as a result of the processing done there. Custom blocks that return a value are called REPORTER because of this. Note that blocks placed after the RETURN block will not be executed.
To demonstrate the true use of the RETURN block, a custom block function called "it's HOT" is programmed. The micro device temperature sensor value is used as input to the function. Arbitrarily, if the temperature is above 27deg C, the function returns true (meaning it is HOT). Any other temperature value makes the function just return the temperature input.
To use the custom block in the program, two WHEN blocks are programmed to monitor and react to the temperature changes. One WHEN block monitors for the true value returned by the custom block. When detected, it alerts "time to cool off."
The other WHEN block monitors the opposite condition, i.e. when true is NOT returned. In that case the program displays a message indicating the current temperature.
To test the program, simply hold the micro device processor between your fingers and allow its temperature to rise according to your body temperature. Alternatively, apply a small heat source to the sensor area.

when received

This block and its functional pair BROADCAST is usually used together to achieve a means of communication within the program. Any message sent with the BROADCAST command is detected and received via the WHEN RECEIVED block. Thus, blocks placed under this block will be run upon reception of the corresponding message. Messages can be either strings or numbers. Also, the block LAST MESSAGE contains the last message broadcast and received.
Broadcasting is superficially similar to calling a function in that both invoke a named actions, but they work differently and serve different purposes.
Function calls:
- can pass parameters and, for a reporter, return a result
- are one-to-one: there must be exactly one function defined with the given name
- are synchronous: the calling script does not proceed to the next block until the function returns
Broadcasts:
- cannot pass parameters or return results
- are one-to-many: there can be zero, one, or more than one "when _ received" script for a given broadcast
- are asynchronous - calling script proceeds without waiting for any triggered scripts to complete
- launch tasks - triggered scripts launched as tasks that run in concurrently with caller and each other
The broadcast idea was invented for Scratch as a way to coordinate multiple independent sprites. But broadcast is also useful in MicroBlocks to as a way to start one or more concurrent tasks.
Broadcasting is also used as a message communication mechanism between MicroBlocks and other systems. For example, we use broadcast with TeachableMachine to make MicroBlocks projects respond to image recognition results from a laptop. We use the same mechanism to communicate between MicroBlocks and Snap! and between MicroBlocks and MIT App Inventor running on mobile devices (via Bluetooth BLE in the latter case).
This example makes use of all the message related blocks in the Control category. when START is clicked, the program waits 2 seconds and then sends out the "test" message. The WHEN RECEIVED block is monitoring the messages and is looking for the "test" message specifically. When it receives it, it will run the blocks under it. The message received will be scrolled on the micro device LED panel and displayed in the IDE.

broadcast

See WHEN RECEIVED above. This block sends out the message content specified into the program context. All WHEN RECEIVED message blocks with the same message content will receive the message and act on it.
This example makes use of all the message related blocks in the Control category. when START is clicked, the program waits 2 seconds and then sends out the "test" message. The WHEN RECEIVED block is monitoring the messages and is looking for the "test" message specifically. When it receives it, it will run the blocks under it. The message received will be scrolled on the micro device LED panel and displayed in the IDE.

comment

This a simple block that does not do anything in particular. It is used to place comments into the program block sequences.
range

This block is used to set a range parameter for the FOR Loop.
The hidden parameter "by" is used to adjust the incrementation value + or -.
After adjusting the blocks values, place the block into the second parameter of the FOR Loop block.
Note that the range block can be used in ascending or descending order with numbers.


NOTE that the range block result is a list of numbers and it is allocated at the time of block execution. If this feature is used with very large number ranges, the pre-allocation may present problems with memory availability. Check the resulting list size before committing to your code.
for
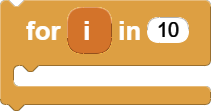
This block is one of the looping C-blocks. It operates two different ways depending on the specified input type.
If the input is a NUMBER, blocks placed within will be executed as many times as the number. At each iteration of the loop, starting with one, the i control parameter will be incremented by one. This value can be used in the program code as one sees fit.
The name of the control parameter can be changed to something else by clicking on the i and typing in a new name for it.
If the input is a LIST, blocks placed within will be executed as many times as the number of items in the list. At each iteration, the i control parameter will take on the value of each list item in sequence.
The example demonstrates both uses of the FOR block.
First group of blocks show that the input parameter is of type NUMBER. Therefore, at each iteration of the loop, i takes on the values 1, 2, 3; and the SAY block displays the values 1, 2, 3.
Second group of blocks show that the input parameter is of type LIST. The name of the control parameter i has been changed to item to better match the list type. Therefore, at each iteration of the loop, item takes on the values cat, dog, bird in sequence; and the SAY block displays the values cat, dog, bird.

repeat until

This looping C-block is used to run blocks placed within it, until the specified boolean condition becomes true. At that point, the next block after the C-block will run.
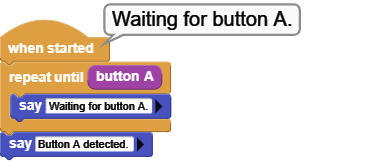
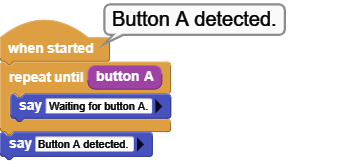
The state of button A is checked in the REPEAT UNTIL block, and a text message is displayed. When button A is pressed, "Button A detected" is displayed.
stop this task

This block, and its related pair STOP OTHER TASKS, are both used to control program execution. This block stops the execution of all blocks that it is a part of, or are under the same hat block. Once this block is executed in a group of blocks, nothing else will run in that group. All other parts / block groups of the program will continue running.
The example is demonstrating the use of both stop blocks:
The block group on the right is in a continuous loop counting down and decrementing its num local variable.
The left group of blocks are also in a continuous loop, counting down and decrementing their local variable num.
However at num = 10 in the countdown, the left sequence exercises control over the other group and stops it using the STOP OTHER TAKS block.This is shown by the fact that the other block's forever loop and the countdown terminates at num = 10, as displayed.
The left block sequence continues running, while checking for condition num <= 0. When it reaches that point, it executes the STOP THIS TASK block and terminates its own running, after displaying the message "Stopping at 0".
Notice that the very last SAY block in the left sequence is NEVER executed. Once the STOP THIS TASK is issued and completed, all activities of the left block is terminated. Hence no display of the message "After the FOREVER loop".

stop other tasks

This block, and its related pair STOP THIS TASK, are both used to control program execution. This block stops the execution of all other blocks in the program. Once this block is executed in a group of blocks, all other parts / block groups of the program will stop running.The group of blocks that this block is located in, or are under the same hat block, will continue running.
The example is demonstrating the use of both stop blocks:
The block group on the right is in a continuous loop counting down and decrementing its num local variable.
The left group of blocks are also in a continuous loop, counting down and decrementing their local variable num.
However at num = 10 in the countdown, the left sequence exercises control over the other group and stops it using the STOP OTHER TAKS block.This is shown by the fact that the right block's forever loop and the countdown terminates at num = 10. This is observed when you run the code.
The left block sequence continues running, while checking for condition num = 10. When it reaches that point, it executes the STOP THIS TASK block and terminates its own running, after displaying the the message "Stopping at 0".
Notice that the very last SAY block in the left sequence is NEVER executed. Once the STOP THIS TASK is issued and completed, all activities of the left block is terminated. Hence no display of the message "After the FOREVER loop".

Advanced
wait microsecs

This block pauses the executing stream specified number of microseconds. It is used to pause and resume execution of code in a controlled manner.
See milliseconds above for the example program.
last message

Returns the last message ever sent in the entire program, chronologically speaking.
Note that it is NOT the last message received by a particular block sequence of the program, and is independent of the execution of the block WHEN RECEIVED.
There is no queueing of the messages in the system. If there is no matching WHEN RECEIVED waiting when a message is sent, it will be missed, and overwritten by the next message.
The left block sequence fires off three messages in a row with 50 millisecond pauses in between. The right block sequence reports the last message encountered when it receives message "one".
When executed, one sees the message "three", but never the message "one", even though the WHEN RECEIVED block is activated when message "one" is received. That is because of the WAIT 500 MILLISECS in the code. The delay is so long that even though the set of blocks execute when message "one" is received (at that time, last message = one), by the the time SAY executes, two more messages have been received and the last message is no longer "one" but "three".

call custom command

Calls the named custom block (function name), optionally with a parameter list.
Custom block called is defined in the My Blocks category. If it has input parameters, these can be passed to it in the call block via the parameter list. Even a single parameter needs to be in the format of a list.
The function name entry will list all the custom blocks defined when the down arrow is selected.
We have defined a custom block called blink. We are going to run it using the call block.
Blink does not have any parameters, so we are not using that section of the call block.
The picture shows the definition of the blink, its in-use format, and the call statement with the function name selected.

call custom reporter

Calls the named custom block (function name), optionally with a parameter list; and returns the result of the call. Normally this would be assigned to a variable for further processing.
Custom block called is defined in the My Blocks category. If it has input parameters, these can be passed to it in the call block via the parameter list. Even a single parameter needs to be in the format of a list.
The function name entry will list all the custom blocks defined when the down arrow is selected.
We have defined a custom block called concatenate. It is programmed to take the two string entries and return another one that places them one after the other.
We are going to run it using the call block.
Concatenate has two parameters, so we are using parameter list section of the call block to pass them to the call block. Since parameters have to be in list format, we are using the data category block list to convet them into a list type.
The picture shows the definition of the concatenate, its in-use format, and the call statement with the function name selected. The call result is also shown.

¶ arg

Useful for working with optional arguments. Returns the given argument or defaultValue if the argument was not supplied by the caller.
