¶ Overview
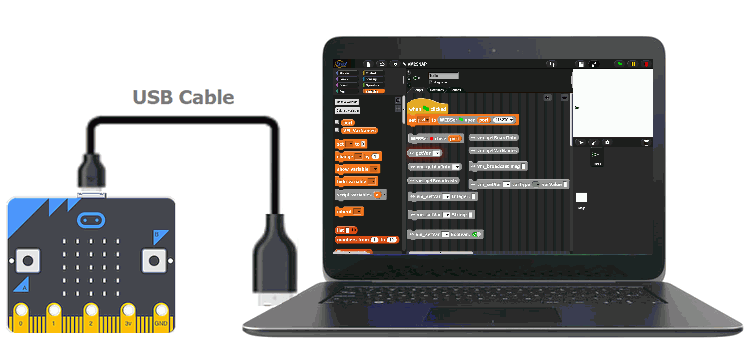
This document describes how to interact with a board, programmed with MicroBlocks, from SNAP via a USB cable. Using the library blocks presented here, SNAP can request information from the MicroBlocks project, including the names and values of variables, the board type, and any messages that have been broadcast. It can also send information to the MicroBlocks project by changing the values of variables and sending it broadcasts. These features allow SNAP to control a MicroBlocks project, display and log sensor data from MicroBlocks, or use MicroBlocks sensors to control a SNAP game or other application.
¶ Summary of Blocks
¶ Connectivity
A script, written in the Microblocks IDE, is loaded and running on the micro:bit device. The SNAP Serial Ports library is loaded into a SNAP project running on the PC. Two devices are connected with an USB cable.
This setup facilitates programmatic communication to the VM code running in the micro device. This way, any SNAP project can obtain a list of script variables running on the micro device, exercise read and write control over them, send and receive broadcast messages, and check the device type.
Using this feature will enable the user to treat the attached micro device as an extension of the SNAP project and the other way around, as well as to fully integrate specific capabilities of both environments with each other.
Since the communication is over a direct USB link operating at 115200 bps, the information exchange is very fast.
In a section below, we will review the blocks that make up the library services, and their usage details.
¶ Working with Library Blocks
The library consists of a set of simple services, that together allow the user to have complete control of the variables and broadcast messaging facilities of the micro device.
This SNAP Library has two distinct types of block shapes:
-
oval: these are reporter blocks that return some kind of information back. The user would normally either assign these to a project variable or use it in a suitable input slot of other blocks. The return information type is a LIST.
-
rectangular: these are command blocks that perform a programmed function and do not return any information. They are one-way only.
The information returned by the oval blocks is usually in a two column list format. This is also referred to as the key:value pair format. Thus, it is very easy to extract any info needed, by simply referring to the data in the first column (key).
The SNAP block that lets us extract the information is: 
As an example, lets review the result returned by the vm_getBoardInfo block:

As you can see, the two column table has the key values of version and type in the first column. We can use any one of these two keys to get to the corresponding second column information. Here is an example of how this block may be used to extract type information from the vm_getBoardInfo block.

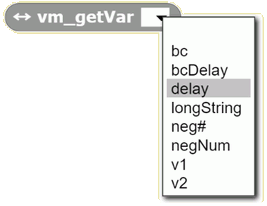
This SNAP library makes use of an internal data dictionary to store the names of the variables used in the MicroBlocks project. Whenever a library block requires the entry of a variable name, a pulldown menu showing all the variable names will be provided to make the selection process easy and error-free.
To populate the data dictionary, one needs to execute the vm_getVarNames block as one of the first blocks in any project. You only need to repeat this process if the variables on MicroBlocks side change due to program modifications.
Here is an example of the vm_getVar block and its display of the variable names:
Now that you understand how to work with the library blocks, let's go on to the block descriptions.
¶ Block Descriptions
¶ vm_getVarNames

This block is used to obtain a list of the variable names of the MicroBlocks program running in the micro device. To make working with the library easy, it is best to execute this command once in the beginning of any SNAP project. Then the variable names will be available throughout the project.
The variable names received are placed into a dictionary data structure to facilitate the library usage. The name of this dictionary variable is VM_varNames.
With the help of the dictionary, we are able to use all the library commands by referring to the actual names of the variables, instead of the encoded ID's.
Since MicroBlocks program variable names do not constantly change, we usually have to use these blocks just once when we first start our interaction with the micro device. Every time you use this block, the pulldowns will also refresh automatically.
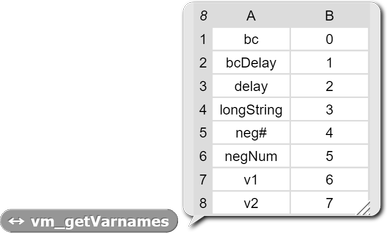
The dictionary that is generated contains key:value data pairs, where keys are the variable names, and the values are the variable ID numbers used by the program internally. This associative relationship allows us to only use descriptive variable names with the library commands.
Below is a sample display listing variable names received.
¶ vm_getBoardInfo

The vm_getBoardInfo block enables us to query the type of device we are communicating with. Since different devices have different characteristics and specifications, the information provided by this block is helpful for us to customize the SNAP project accordingly. We simply need to code whatever we want done with the info returned by this block.
As shown in the picture below, the information returned consists of the device firmware version and the type of the device.

Since this is also a type of info that does not change throughout the interaction with the micro device, it might be useful to save the board info into a variable, to be used whenever needed.
¶ vm_broadcast

The broadcast command is a dual purpose command. It can be used by the SNAP project to signal intentions to the MicroBlocks project running on the micro device, as well as by the micro device to send programmed broadcast messages to the SNAP project. It is also representative of a one way command described above. We issue it and there is no reply. Or the micro device issues it and it arrives unannounced.
This block has an input field msg that needs to be provided as the message text that will be sent out.
In the example use shown below, we send out a message "start Motor" to the micro device. It will receive this message via a MicroBlocks script block when start Motor received running in the micro device.


¶ vm_getBroadcasts

As was mentioned above with the vm_broadcast command, broadcast messages originating in the micro device can arrive totally unannounced in the SNAP Project.
This command will read the USB port and search for any broadcasts received. This is not the best method to properly handle the broadcast type messages. But it will do initially to get the point across.
The broadcast messages that are received will be returned by this block in a list format, one entry per message. In addition to this command, all other library commands also spawn a separate thread searching for any broadcast messages, just in case. Broadcasts found by this command and/or by the other threads will be deposited to the VM_BCQueue message list. The user should process this message queue and delete it as needed.
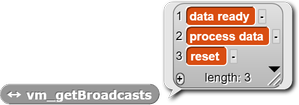
Here is an example display from the MicroBlocks sample program, when the B-Button on the micro device is pressed.
Don't forget:
Every time this block is used, the received broadcast messages are displayed, returned and they are erased. However, the copies placed in the VM_BCQueue will remain there until the user deletes them.
¶ vm_getVar

This block is the simpler version of the following VM_getVarInfo block. Instead of displaying the entire variable information set, it will just display the value of the variable.
Select a variable name from the pulldown list, and its value will be returned.
Here is the display for the delay variable of the sample MicroBlocks program:

¶ vm_getVarInfo

Here we have a block to retrieve variable information from the script running in the micro device. vm_getVarInfo sends out the request for a particular variable, and displays the variable information when the response arrives.
Note that the vm_getVarInfo has a parameter that needs to be set to the name of the variable whose information we want to get. Remember that the pulldown list will provide the names of the MicroBlocks variables.
vm_getVarInfo block provides us with four pieces of information for each variable: name, type, length, and the value. The variable types are 1-Integer, 2-String, and 3-Boolean. The four pieces of information can be obtained as described in the Working with Library block information above.
The picture below shows an example of the result returned for the variable named delay:
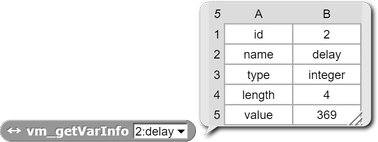
And here is how the key at value block can be used to retrieve the data 369:

REMEMBER that you can also just use the vm_getVar block to simply retrieve the value of any variable.
¶ vm_setVar


This set of three commands enables us to set the value of a variable in a script running on the micro device. It is a one-way command with no reply.
The block requires two parameters: variable name and variable value.
We already covered the variable name above.
The value parameter determines the value to be set for each of the three variable types supported.
The supported limits for the three types are:
-
Integer values have to be between -1073741824 and 1073741823.
-
String values have to be up to 800 bytes long.
-
Boolean values are
 and
and 
These will make the variable on the micro device side to be set to MicroBlocks blocks respectively.
¶ Setup
The library blocks are presented in a "VM2SNAP_v3.XML" sample project file, together with all other needed libraries, to make it easier for the user to start exploring.
Also provided is a small MicroBlocks sample project file "VM2SNAP.UBP" that will help the user test the initial interaction between the SNAP and the micro:bit device.
NOTE: The Library blocks are already a part of a SNAP library, that can be imported with the standard Libraries menu option.
¶ You Will Need
micro device (micro:bit or similar kind)
USB cable
Sample SNAP project with the library loaded
Sample MicroBlocks Program to test with
¶ Download Program Files
The SNAP sample project file (includes the Library) can be downloaded here: VM2SNAP_v3.xml
The MicroBlocks sample program can be downloaded here: VM2SNAP.ubp
¶ Prepare Your Environment
Your connectivity will look like the picture below:
Your choice of a micro device connected to the PC USB port with a regular USB cable.
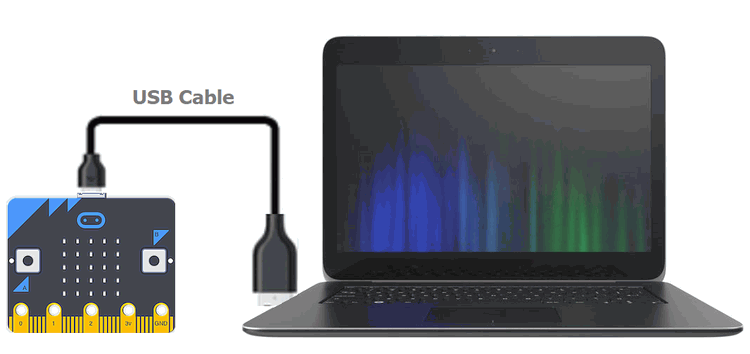
We are creating a communication link between the MicroBlocks VM running in a micro device and SNAP running in the Windows environment. Let's review setups for both sides.
¶ MicroBlocks Side
- Run either the Standalone or the Browser version of the MicroBlocks IDE.
- Load the MicroBlocks sample program you have downloaded into the IDE.
- Connect a suitable micro device of your choosing with a USB cable to the PC where MicroBlocks IDE is running.
- Enable the USB connection by clicking on the USB icon and making sure it turns green:

- Click the Run icon and observe the display on the micro device. It should be as shown in the video below:
If you see the letter "F" with the flashing User-LED on the micro device, that means you have successfully completed the MicroBlocks project load. Now you can click the USB icon and choose disconnect to terminate the USB connectivity to the MicroBlocks IDE.
The USB port can only be connected to one program at a time. Therefore it is necessary to disconnect the MicroBlocks IDE connection before establishing one to the SNAP IDE.
Your MicroBlocks program loaded onto the micro device will continue running, even though the IDE connection is no longer active. You can verify this by observing the display of the micro device.
You can now proceed to the setup of the SNAP side.
¶ SNAP Side
- Run the SNAP IDE and load the Sample SNAP file you have downloaded.
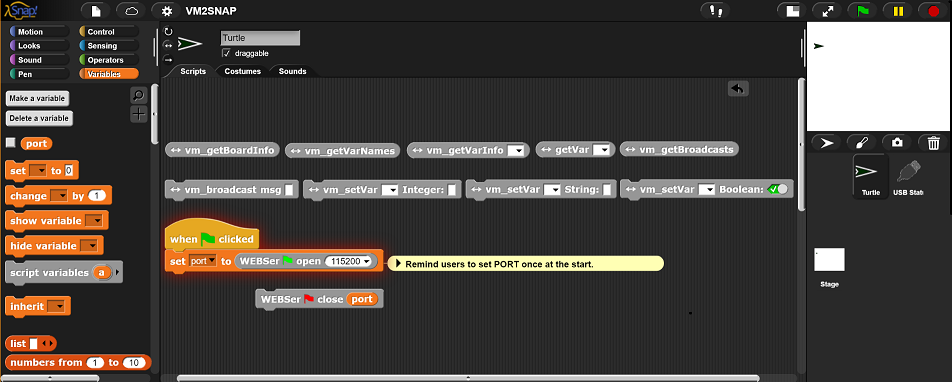
Your SNAP IDE screen should like this:
¶ Connecting the micro device to the SNAP IDE
Make sure you have disconnected the USB link to the MicroBlocks IDE, as described above.
The SNAP XML file you have downloaded makes use of another library called Simple Serial Library, that is responsible for establishing and operating the USB connectivity. This library is already included in the downloaded file. We have provided a minimal Startup logic to establish the USB connectivity to the micro device.
If all is well so far, we are ready to proceed to the testing of the interaction between the devices.
¶ Testing the Setup
First thing we need to do is to establish the USB connectivity between the micro device and SNAP. To do this, we need to start the SNAP project by clicking on the green flag icon.
This will initiate the USB connectivity routine and pop up a menu of USB ports available on the PC. Select the port that the micro device is connected to and click the connect button.
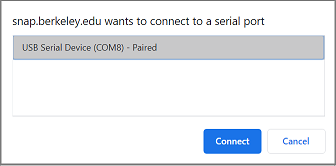
NOTE: Your own USB port name and numbers most likely will be different. Select accordingly.
When you achieve a successful USB connection, you will see the USB Status sprite located at the bottom of the SNAP display area turn green, just like the MicroBlocks USB icon.
![]()
If you have gotten this far without any issues, now we are ready to test the information exchange between the devices.
¶ Inbound Communication
We need to press SNAP block vm_getBroadcasts and button-B on the micro device back to back in a coordinated manner:
- click on the vm_getBroadcasts library block in SNAP!.
- On the micro device, press the button-B.
This will initiate three broadcast messages to the SNAP program. The broadcast messages that were received are retrieved and displayed and the queue is emptied.
You should observe the following display on the SNAP screen.
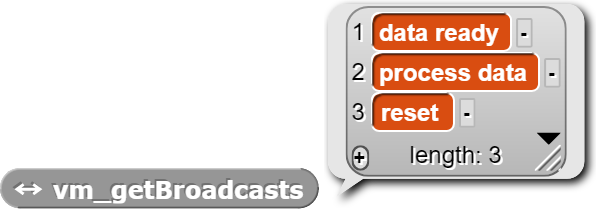
If you have followed and gotten the same results described here, we have shown that inbound communication is working fine.
Now, it is time to test the outbound communication.
¶ Outbound Communication
The accompanying MicroBlocks sample project is programmed to display a received broadcast message content. There are two such scripts provided.
Using the vm_broadcast msg block, we will send a message of "A" to the micro device. This should make it display the letter "A" on the micro device LED display.

Locate the vm_broadcast msg block and type in the letter "A" into the open slot. Then click the block. You should seel the letter "A" displayed on the micro device LED display for a few seconds. Then it will disappear. If you missed it, you click it again to catch it.
Here is a video of the micro:bit display reacting to the broadcast message with the letter "A:
There it is ! We have tested both inbound and outbound connectivity between our devices. Messages were exchanged and displayed on the SNAP and micro device screens.
Now that everything is working OK, you can proceed to experimenting with all the other blocks described above.
¶ Working with Web Serial Blocks
This library makes use of the Simple Serial WebUSB library to access the USB port of the PC. As such, for every program that wants to use this feature, it will be necessary to take the following initial steps at the start of the SNAP Scripts:
-
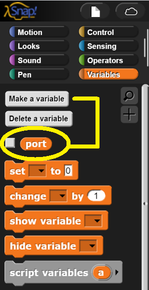
declare a global variable called port to store the information about the USB Port object (Already done in the sample program).
-
Use the WEBSerial Open block to estabish the USB connectivity and assign the result to the port variable declared earlier.

Take care to ensure that the speed parameter is 115200, as shown in the picture above. This is required for the proper functioning of the Library feature. When working with the MicroBlocks VM, the speed has to be 115200.
If you use the library with other micro devices, you may adjust the speed accordingly.
USB Status Sprite mentioned in the "Testing The Setup" section above will track the status of the USB connectivity. When it is open and connected, it will display a green USB plug picture. When the connection is down, the green circle will disappear. This real time status display is only valid if you have started your program by clicking on the SNAP green flag icon.


