¶ Overview
REX Kit library is used to program the REX Controller and the related components that come with the Robotistan REX 8-in-1 Kit. The controller is an ESP32 based board, augmented by self-charging LiIon batteries.
For details of the board and how to set it up, please refer to REX Controller Board section.
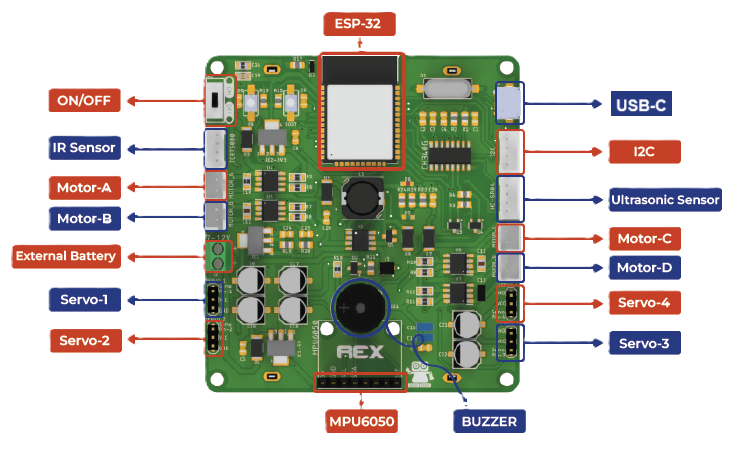
An image of the controller board with the relevant component attachment points have been provided to help you determine the locations of the components your code is attempting to control.

¶ Summary of Blocks
For each block, there is a short description entry and a detailed block and component description. You can click on block pictures in the short description table to access the details and sample codes.
Sample codes on how to use the blocks have been provided. To try them out, all you have to do is open a browser session of the MicroBlocks IDE and drag and drop them onto the editor programming area. Then you can just click on them and see the results.
To test any of the sample codes below, just drag and drop them onto the MicroBlocks IDE.
¶ Working with Library Blocks
The library consists of a set of simple services, that together allow the user to have complete control of the REX Control Board and the modules attached to it.
Library has two distinct types of block shapes:
-
oval: these are reporter blocks that return some kind of information back. The user would normally either assign these to a project variable or use it in a suitable input slot of other blocks. The return information type can be any of the supported data types.
-
rectangular: these are command blocks that perform a programmed function and do not return any information.
¶ Block Descriptions
¶ REX Arm servo

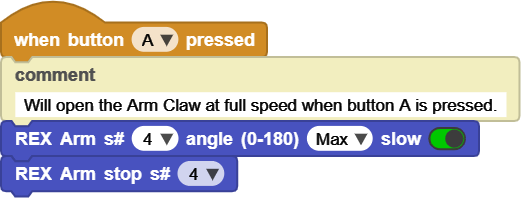
Controls the servos on the ARM Module of the REX Kit.
While MicroBlocks Servo Library can be used for the Servos, this block provides additional control of the servo movement speed, as well as ability to select any and all servos.
Menus in the block allow selection of one of the four servos (base, 2, 3, top) or ALL of them, as well as angles (#, Def, Min, Max) to position the servo to. Upon a menu selection, the parameter areas will reflect the internal program specific values for the servos and angles. Do not pay attention to the final values, but work with the menu selections.
ARM Servo angles have been programmatically restrained to prevent dangerous Arm movements. Initial settings will ensure safe operation of the Arm segments within predetermined movement ranges.
Once you get comfortable with the settings and motions, these settings can be user-modified to exert full control over the Arm servos.
There are three different sets of servo angle LIMIT values: default, minimum, and maximum.
The library comes preset with these servo angle limits to prevent unintended servo movements that may be damaging to the hardware. These limits are stored in three different variables:

The four numbers represent the respective limit values for each of the four servos 1 - 4.
eg: minimum value for servo# 2 is 20, maximum value for servo# 1 is 180.
Last parameter slow (True / False) is used to control the movement speed of the servo selected. This defaults to slow to ensure safe execution of the movements selected. Depending on what you intend and your comfort levels, this selection can be changed to False, and thus speed up the servo operations.
WARNING:
Please be cautious when selecting the FAST servo motion or bypassing the built-in safety settings of the servos when using this block, as it can cause damage to your kit setup.
¶ Sample Code

¶ REX Arm stop

Stops selected servo motors and powers them down.
While this step is normally not needed when using servos, it is necessary if one wants to move the servo mechanisms manually. This cannot be done if the servos are in a powered up state.
Another thing to be aware of is that in a powered down state, Arm servos may change position depending on the load on them and what position they were in when powered down. Keep this in mind when using this command.
¶ Sample Code

¶ REX beep

Emits a tone from the piezzo speaker on the control board.
¶ REX distance

REX Kit component HC-SR04 ultrasonic sensor is used to measure distances to obstacles. It returns distance to objects detected in the range of 4-400cm.
¶ Sample Code
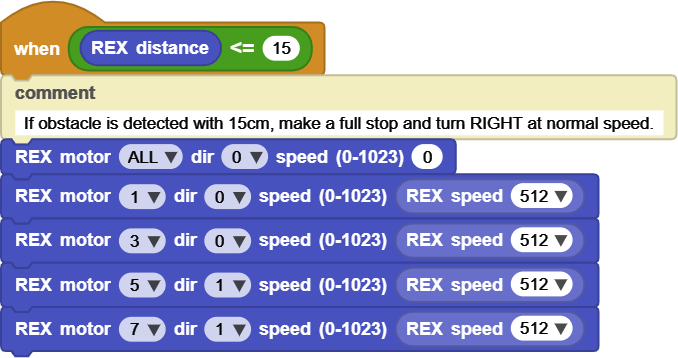
Sample script provided will detect objects with 15cm of the sensor, make a full stop, and turn the car to the RIGHT to avoid it.

¶ REX motor

Controls the four DC motors (A, B, C, D, ALL) of the REX Kit.
Menus in the blocks allow selection of one of the four motors (A, B, C, D) or ALL of them, as well as direction of turn (fwd, bwd) for the motor selected. Upon a menu selection, the parameter areas will reflect the internal program specific values for the motor numbers and direction. Do not pay attention to the final values, but work with the menu selections.
Last parameter speed controls the rotation speed of the motor selected. A range of 0-1023 is supported. Optionally, REX speed block can also be used to set this parameter with standard menu settings for slow (256), normal (512), fast(1023), and stop(0).
Since there are four motors, selection of ALL motors presents a problem of in what sequence to apply the commands to the four motors. Positioning of the motors is A & B on the LEFT side and C & D on the RIGHT side. As such, A & C become the front motors and B & D become the BACK motors.
Based on this setup, ALL selection for the motors applies the commands in the order of FRONT motors first (A and C) followed by the REAR motors (B and D). Remember that you can change this sequence by chosing to use separate commands for each motor.
¶ Sample Code

¶ REX line sensor

This block returns the IR Line sensor (TCRT5000) results. There are two line sensors (V1 and V2), each able to detect a dark colored line and report TRUE when detected.
Positions LEFT and RIGHT are based on viewing the car from the top, when it is pointing forward.
Sensor V1 is on the left and sensor V2 is on the right.
¶ Sample Code
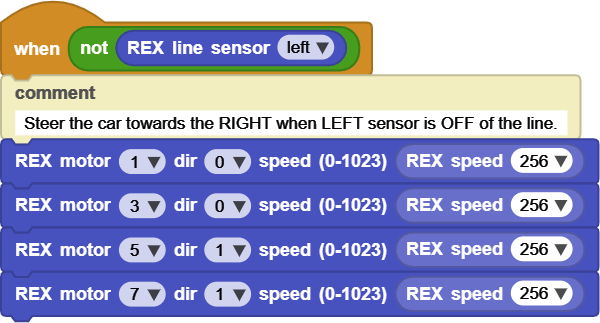
This script steers the car towards the right when the left sensor veers off the line detected.

¶ REX sees line

This block returns the interpreted line sensor result described in the block above, such that it is easier to code the line tracking actions.
There are a total of four conditions that the two Line sensors can be reporting. When the selected 2-sensor setting in the block matches what the actual sensors detect, TRUE will be reported.
| LEFT | RIGHT |
|---|---|
| false | false |
| false | true |
| true | false |
| true | true |
Using these, it is very easy to use when condition blocks to steer the car.
¶ Sample Code
These scripts steers the car straight when both sensors see the line, and stop the car when both sensor do not see the line.

¶ REX speed

This block provides an easy way to set motor speeds controlled by entries in a menu.
Four standard speed setting have been provided: slow (256), normal (512), fast (1023), and stop (0).
¶ Sample Code
Refer to Sample code block for above block.
¶ _REX Arm new default

¶ _REX Arm new max

¶ _REX Arm new min

Above three ADVANCED blocks are used for changing the three different sets of servo angle LIMIT values: default, minimum, and maximum.
The library comes preset with these servo angle limits to prevent unintended servo movements that may be damaging to the hardware. These limits are stored in three different lists:

The four numbers represent the relevant limit values for each of the four servos 1 - 4.
eg: minimum value for servo# 2 is 20, maximum value for servo# 1 is 180.
These three blocks allow the user to adjust these limit values if there is a need for them, or they want to change the behavior of the servos.
Since these changes are not permanent, the scripts written to use these new limits have to include the adjustment blocks as well. Best way to implement this is in a startup script where the library is initialized, followed by application of the adjusted limits.
¶ Sample Code
As an example, we will use the _REX Arm new minimum block to change the minimum value of the first servo to a value we want: from 0 to 45.
We will use the when started script to initialize the library, followed by the application of our new limit. Since the when started script executes every time the program is run, our changes will always be present and applied when this program is executed.
Sample picture shows individual blocks used, as well as the entire script under when started, to better explain what is happening.

After _REX initialize is executed, rex_armMin values are 0, 20, 0, 0.
Then we execute the _REX Arm new minimum block. The values in the block match the values after the _REX initialize, except that we are replacing the first value with our new value of 45.
When _REX Arm new minimum executes, it displays the old and new values for the rex_armMin.
¶ _REX anglevalid

Used internally to verify the angle values used are within 0-180 degree limits intended for the 180 degree servos used.
¶ _REX anglesOK servo

Used internally, this block verifies that selected servo angle is compliant with the limits set for that servo, as described in the REX Arm servo block above.
¶ _REX initialize

Initializes the library prior to block usages. Initialization is internally checked and executed if needed.
In case the user wants to modify the servo limits using one of the REX Arm new blocks described earlier, it is suggested that a startup script be created with the library initialization followed by the desired limit adjustment blocks. This will ensure correct and intended values for the servos are being used in the user scripts.
Enjoy your kit.