¶ Overview
HuskyLens is an easy-to-use AI machine vision sensor. It can learn to detect objects, faces, lines, colors and tags. Everyone can easily program the HuskyLens through the MicroBlocks HuskyLens Library.
HuskyLens library is 100% written in MicroBlocks and all the code of the library blocks can be examined by right clicking the blocks and selecting show block definition.
The picture below shows all the components and functionality provided by the HuskyLens.
For a detailed description of the HuskyLens features, please refer to the product WIKI
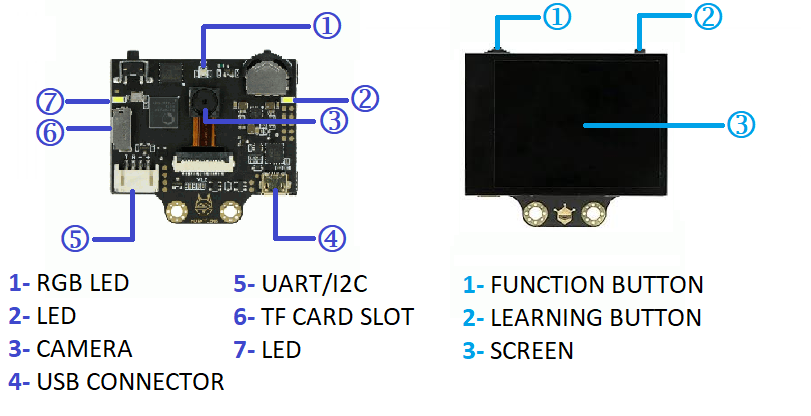
The HuskyLens library provides support for:
- I2C and SERIAL 9600 connectivity
- Request recognized objects from HuskyLens
- Request only one object by id
- Learn the current recognized object with any id
- Write text input on HuskyLens screen
- Save and Load files to/from SDcard
- Save a screenshot or picture to SDcard
- Set a custom name for any learned object
Connectivity Tip:
when using SERIAL connection, make sure the RX & TX of the Camera is reversed at the microController serial port.
¶ User Guide
In the examples used below, you will see references to Button presses. Different microcontrollers come with different implementations of the Button feature. Some offer buttons explicitly marked as Button A or B, while others offer buttons used for other purposes, that may act as -Button-A. ESP and Pico microcontrollers have a BOOTSEL button that can be used as Button-A when programming with MicroBlocks IDE.
HuskyLens has two object types: Blocks and Arrows.
Faces, colors, objects, and tags are Block type.
Lines are Arrow type.
HuskyLens can learn to recognize Objects and assigns an ID number to each learned Object. The ID numbers are consecutive.
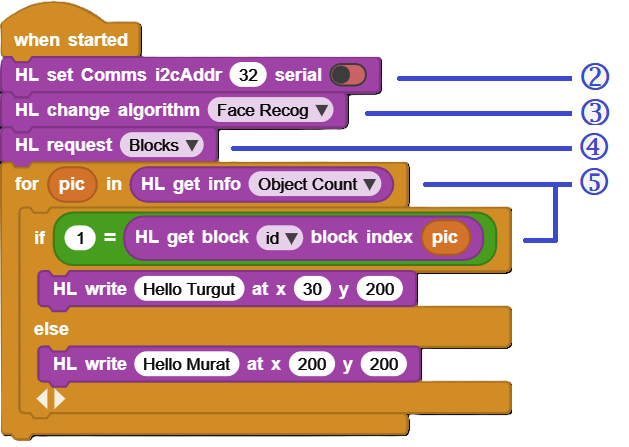
Here is a sequence that needs to be followed in order to obtain any detected object information from the HuskyLens:
| 1. Train HuskyLens using any supported algorithm. 2. Set Communications mode 3. Select Algorithm desired 4. Make a request for Blocks or Arrows 5. Analyze returned data and take action |
 |
|---|
This example makes use of the Blocks request and Face Recognition algorithm.
HuskyLens, assigns 0 to ID number for unlearned objects.
¶ Summary of Blocks
For each block, there is a short description entry and a detailed block description. You can click on block pictures in the short description table to access the details.
¶ Working with Library Blocks
HuskyLens Library has two distinct types of block shapes:
-
oval: these are reporter blocks that return some kind of information back. The user would normally either assign these to a project variable or use it in a suitable input slot of other blocks.
-
rectangular: these are command blocks that perform a programmed function and do not return any information.
REMEMBER:
From time to time the camera hardware might get into a state of unreliable operation. If all attempts to normally restore the operation is not successful, a factory reset of the camera will revert all settings and data acquired up to the reset point to the original startup condition.
Data on the SDcard is NOT affected by this action.
¶ Block Descriptions
¶ HL set Comms

HL camera has Protocol Type settings under the GENERAL Settings menu that determine in what communications mode the camera operates. Three main options are Auto Detect, I2C mode and Serial mode. Serial mode has several speed options (9600, 115200, 1000000), however only Serial 9600 is operational. Do not select any of the other Serial speed options. It may be easiest to set the Protocol Type to the Auto Detect.
This block is used to set the communications modes of the camera and the library. Default is I2C with address 0x32 or decimal 50.
Serial toggle, when set to TRUE, will set the Serial communications at 9600 baud. Setting the Serial toggle to TRUE switches the communications mode to Serial and I2C is no longer used.
This block will do a HL Library initialization in the background.
This block needs to be used before any of the other blocks are used in a program.
It is possible to experience comms problems when using this block, based on the running conditions of the camera and microcontroller used. First try to power reset the camera and the microcontroller and try again. If not successful, try disconnect/connect cycle with the USB cable. Upon successful execution, the block will display the status of the comms setup.
¶ Sample Code

¶ HL change algorithm

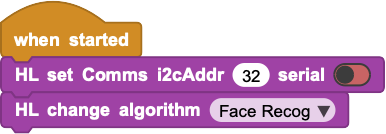
This block is used to select one of the many algorithms supported. At the completion of the algorithm selection, the camera display will indicate the switch to the selected algorithm.
Algorithms: Face Recognition, Object Tracking, Object Recognition, Line Tracking, Color Recognition, Tag Recognition, Object Classification.
Amongst the algorithms, Object Recognition is provided with 20 pre-trained object categories: aeroplane, bicycle, bird, boat, bottle, bus, car, cat, chair, cow, dining-able, dog, horse, motorbike, person, potted lant, sheep, sofa, train, TV. This algorithm cannot distinguish the difference between objects of the same type. For example, it can only recognize that an object is a cat, but it cannot recognize what kind of cat it is.
Another algorithm, Tag Recognition, is programmed to recognize a specific category of tags, called APRIL Tags. These are very similar to the QRCodes, but smaller in size. 587 of these are provided in a downloadable format at this LINK.
¶ Sample Code
¶ HL request

Used to request objects from HuskyLens.
Object types: Blocks, Arrows, Learned Blocks, Learned Arrows
The cycle of accessing HL camera data involves periodic use of this block, with the desired setting of the object type. Once the request is sent to the camera, it will send back packets of information that indicates the detected objects of the type requested. This response is stored in the variable called HuskyData. All subsequent analysis of the camera data is done by accessing HuskyData.
You can consider this process as a state machine:
- Request state: You request an object type from the camera. The camera analyzes the data based on the algorithm selected and returns a result. This Result is stored in HuskyLens.
- Analysis state: You process the data in HuskLens using one of the many blocks.
- You repeat this process as needed.
For details of HuskyData content refer to the What is the HuskyData? section below.
¶ Sample Code

In the example above, when button-A is pressed, MicroBlocks makes a request for Blocks from HuskyLens.
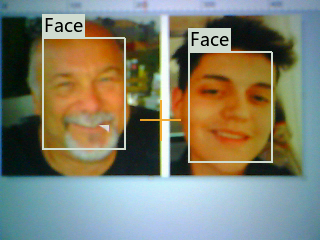
HuskyLens detects 2 different faces and sends back the response, which is stored in HuskyData.

HusyData contains a summary info block (I) and two detected face blocks (B).
For details of HuskyData content refer to the What is the HuskyData? section below.
¶ HL request by id

Used to request learned objects from HuskyLens that match an ID number. Whenever an object is learned by HuskyLens, it is assigned an ID number.
¶ Sample Code

In the above example, when button-A is pressed, MicroBlocks makes a request for learned Blocks with ID# 1 from Huskylens.
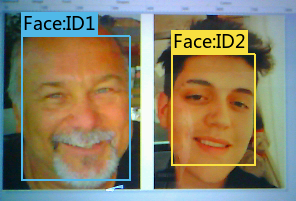
HuskyLens has recognized 2 different faces and sends back the response for the one with ID# 1, which is stored in HuskyData.

HusyData contains a summary info block (I) and one detected face block (B).
¶ HL get block

Used to get data details of detected block objects. In case of multiple object detection, index number can be used to extract information of the (index)th object.
- X Center of Block
- Y Center of Block
- Width of Block
- Height of Block
- ID of Block
¶ Sample Code
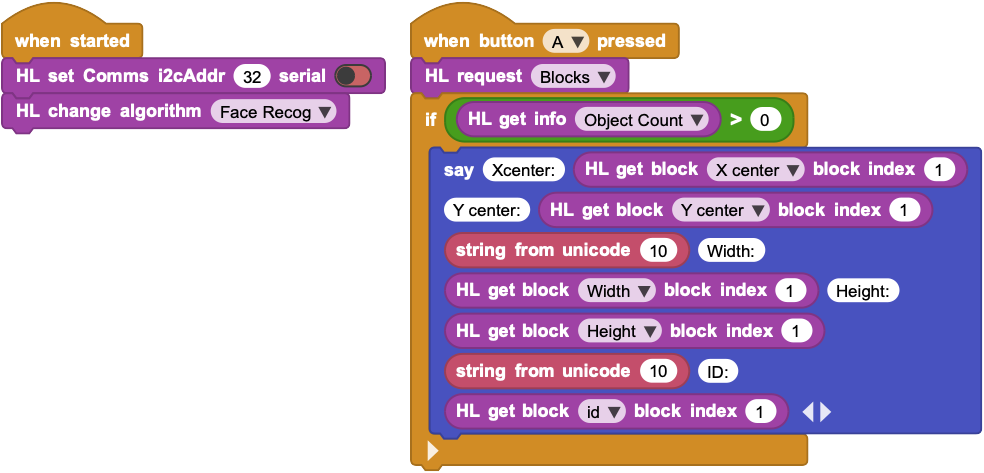
In the above example, when button-A is pressed, MicroBlocks makes a request for Blocks from HuskyLens.
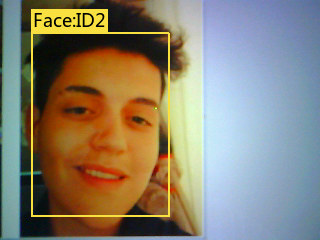
HuskyLens has recognized 1 face and sends back the response, which is stored in HuskyData.

HusyData contains a summary info block (I) and one detected face block (B).
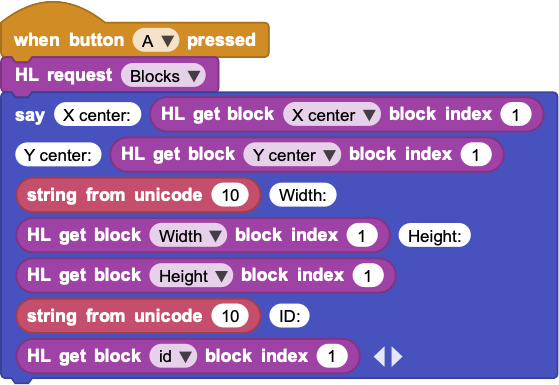
Then we use the say block to display the detected object's data.
¶ HL get arrow

Used to get data details for detected arrow objects. In case of multiple object detection, index number can be used to extract information of the (index)th object.
- X Origin of Arrow
- Y Origin of Arrow
- X Target of Arrow
- Y Target of Arrow
- ID of Arrow
¶ Sample Code
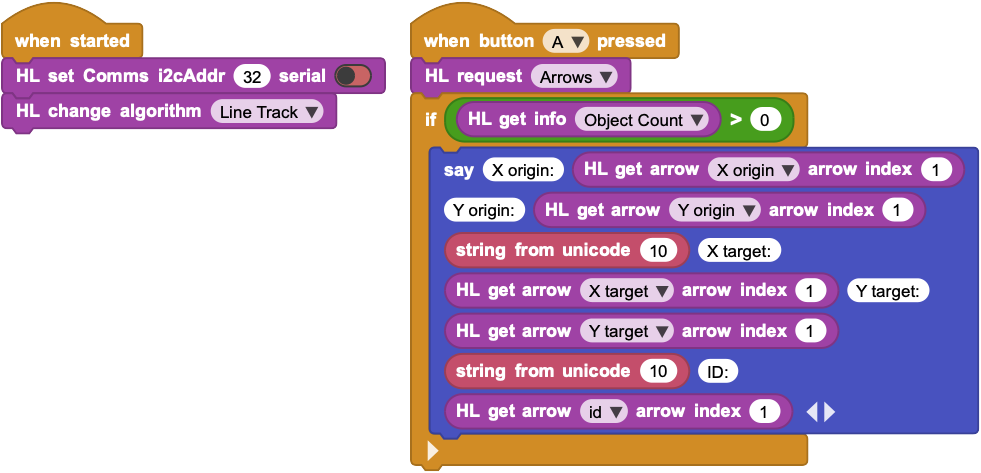
In the above example, when button-A is pressed, MicroBlocks makes a request for Arrows from HuskyLens.
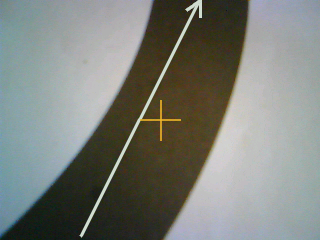
HuskyLens has detected 1 arrow and sends back the response, which is stored in HuskyData.

HusyData contains a summary info block (I) and one detected arrow block (A).
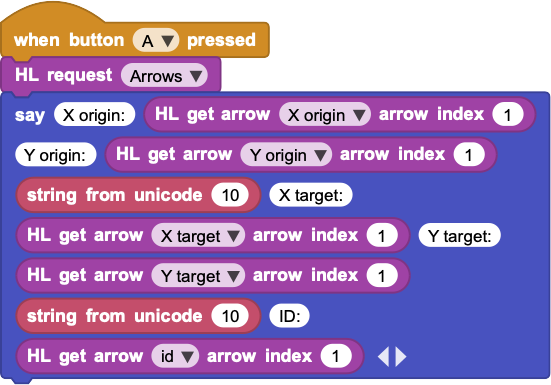
Then we use the say block to display the detected object's data.
¶ HL get info

This block is used to get summary information for the detected objects:
- Object Count : numbers of blocks and arrows
- Learned Count : number of learned IDs for the algorithm selected
- Frame Number : Current Frame Number
¶ Sample Code
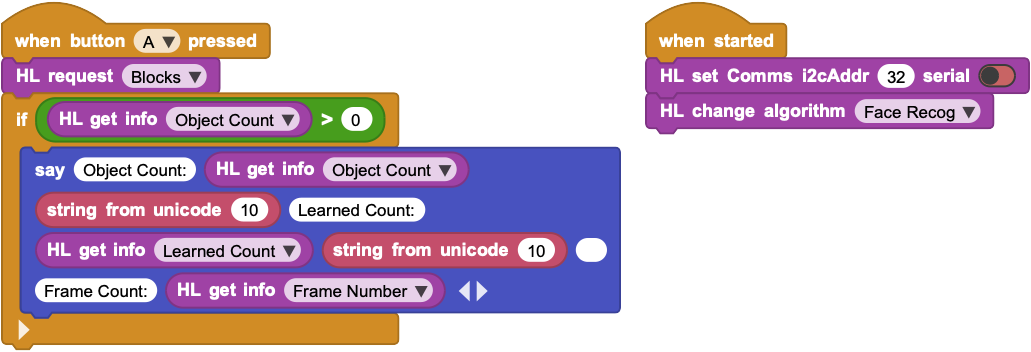
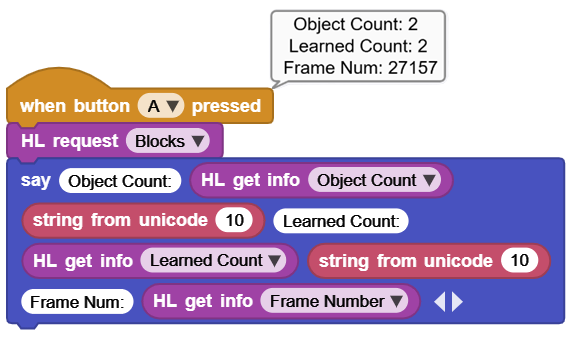
In the above example, when button-A is pressed, MicroBlocks makes a request for Blocks from HuskyLens.
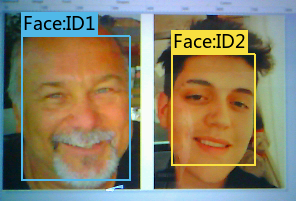
HuskyLens has recognized 2 faces and sends back the response, which is stored in HuskyData.

HusyData contains a summary info block (I) and two detected face blocks (B). Below result display shows the data breakdown for the summary info data (I).
¶ HL do

The block is used for many operations:
- Knock: Used for test connection with HuskyLens.
- Save screenshot to HuskyLens sdcard.
- Save picture to HuskyLens sdcard.
- Clean the screen: Clears the texts on the screen.
- Forget learned objects: Forgets learned blocks and arrows.
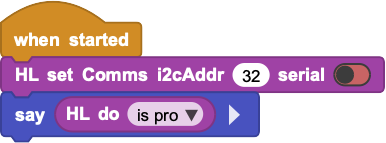
- is pro: ask HuskyLens for the model. Returns HuskyLens is pro or not.
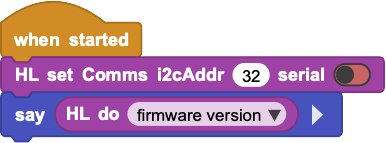
- firmware version: Check if the onboard firmware is out of date.
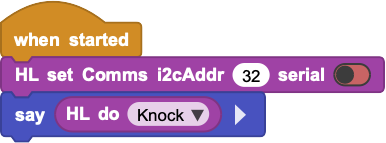
¶ Knock
Used for testing the connection with HuskyLens. If the connection is operational, OK is returned.
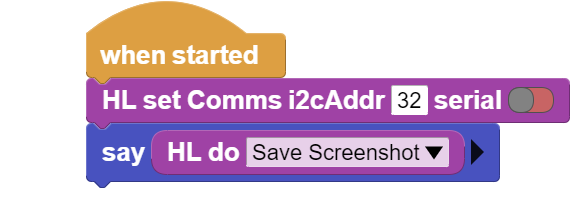
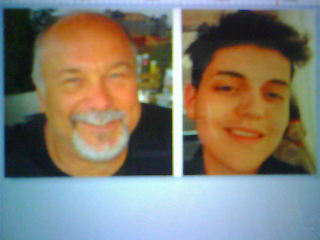
¶ Save Picture and Save Screenshot
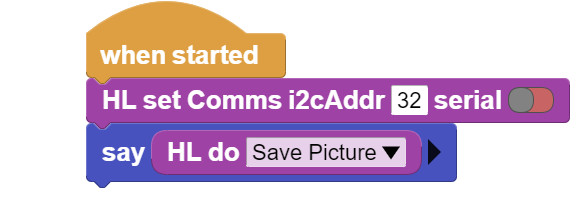
This command saves what is on the screen to the SDcard.
If save picture is used, then only the camera image is saved.
If save screenshot is used, then the camera image and any other generated overlaying GUI information is saved (object boundaries, ID numbers, assigned names, text info displayed).
Files are saved to the SDcard in the BMP format and named in ascending numerical filename order. eg: 1.bmp, 2.bmp, etc.
¶ Sample Code
Picture:
Screenshot:

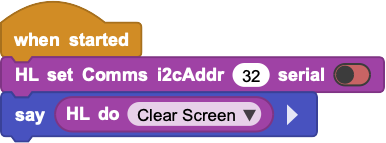
¶ Clear the screen
Clears any text displayed on the screen.
Text may have been written to screen using the HL Write command.
¶ Sample Code
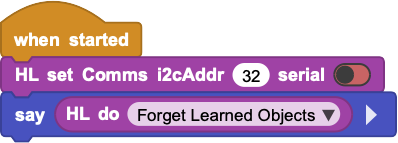
¶ Forget Learned Objects
Forgets learned objects for the current running algorithm.
NOTE:
"Learned objects" are results of training the camera. As such, they are products of long sessions of training effort. When you use this block, all the training data for the current algorithm will be deleted - AND CANNOT BE RETRIEVED !
¶ Sample Code
¶ is pro
Checks what model your HuskyLens is.
Returns HuskyLens is pro or not.
¶ Sample Code
¶ Firmware Version
Checks if the onboard firmware is out of date. If it is an old firmware, there will be a UI message that pops up on the screen. If the firmware is current, OK is returned.
¶ Sample Code
¶ HL write

This block displays the text input at the given display coordinates.
Top left corner is x=0, y=0.
Text length must be less than 20.
X must be 0-319
Y must be 0 -239.
¶ Sample Code
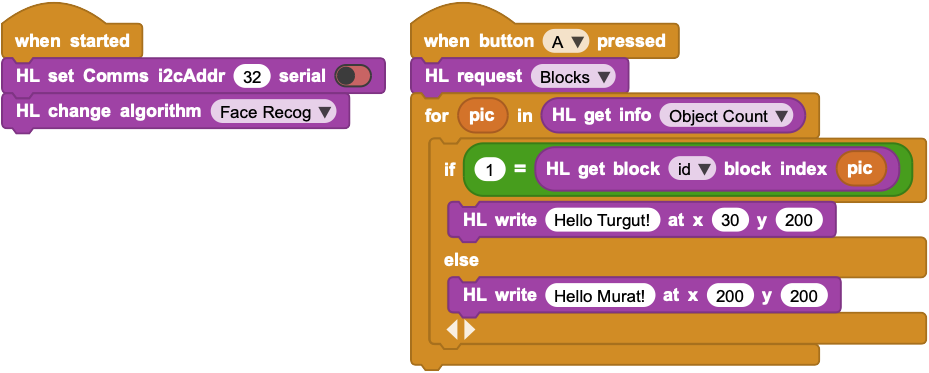
In the above example, when button-A is pressed, MicroBlocks makes a request for Blocks from HuskyLens.

HuskyLens has recognized 2 faces and sends back the response, which is stored in HuskyData.

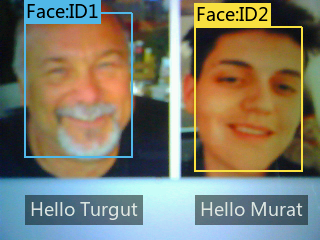
HuskyData contains a summary info block (I) and two detected face blocks (B). We access the "object count" property of the Info block and use it to iterate over the detected images and write their names under each image.
¶ HL file

This command handles the Saving and Loading of the current learned object data to/from the SDcard.
It is used to save the learned objects' information after lengthy training sessions. Once saved, these files can later be loaded under program control and used by the recognition process.
The file name on the SDcard will be the in the format:
"AlgorithmName_Backup_FileNum.conf".
File number range is 0-65535.
Firmware limitations for SDcard FILE Information:
Currently, the firmware saves all files to the SDcard with the exact same timestamp information. Therefore, it is impossible to identify files by modification dates. Since the only portion of the file info under user control is the filenumber, it is suggested that the filenumber be used in a coded manner to distinguish the various saved versions of the same algorithm's training data.
Also, there is no checking or warning for saves that result in filenames that match an existing name on the SDcard. If not careful, a lot of data can be lost with a simple click of the mouse.
Finally, there is no way to edit / modify existing training data files.
¶ Sample Code
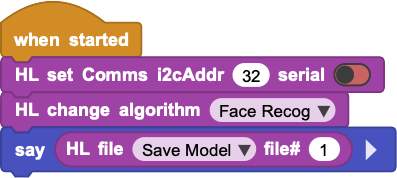
The filename saved to the SDcard will be named FaceRecognition_Backup_1.conf.
¶ HL learn as ID

The block is used to learn the current recognized object with an ID.
ID number must be 1 - 255 and consecutive among the learned objects for the algorithm.
Also, the object to be learned must not be already in the "learned" category; meaning that it must be surrounded by a "white" box and not any other color.
There is a notation in the manufacturer's firmware, that this feature is only to be used with the Object Classification algorithm.
However, all testing indicates that names can be assigned to any detected object.
Nevertheless, user beware and verify for your own purposes.
¶ Sample Code

Before we execute the above example, we have selected the "Face Recog" algorithm and deleted all learned objects to start with.
As such, when the camera is pointed at pictures, it recognizes the two faces and it surrounds them by two white boxes marked "Face", meaning recognized but not learned (no ID numbers means not learned).
Then we focus the camera onto the right face and wait for it to dispay the white box surrounding it. This means the image is recognized but not learned yet.
At this point, for us to assign the correct ID number in the HL learn as ID block in the sample program, we need to know how many "learned objects" there are in the Face Recog algorithm. To find this out, we can execute a HL request command with "Blocks" option. Clicking on this block with the camera pointed at the right face, will capture the image summary info and the block information.

HL request command will set the HuskyData with the information we need.

Now we can use the HL get info block with the "Learned Count" option.

As can be seen in the Learned Count display, there are 0 learned blocks in the algorithm. Thus, we can start our ID number with 1. And that is the number we code into our sample program block.
Finaly, we are ready to execute our sample program, as we point the camera to the right face. When the "Learn status: OK" is displayed, we will notice that the white box around the right face on the camera screen is replaced by a BLUE box with the notation Face:ID1.
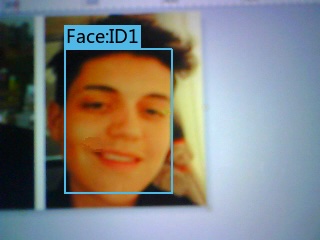
ASSIGNING ID Numbers:
As mentioned above, all ID numbers have to be sequential, starting at the last learned ID number for the algorithm plus 1 or 1 if none is learned yet. Skipping numbers or trying to learn an already learned ID number will result in no Learning even though the block will return an OK for the execution status.
Remember that the last learned ID number can be obtained using the HL get info block with the Learned Count option.
¶ HL set custom name

This Block is used to set a custom name for an already learned object; one with an ID number assigned. It provides a quick way to assign names to learned objects programmatically.
An assigned name can be erased by execuing the command with a blank name. When an assigned name for an object is erased, its display notation changes to the default object notation for the algorithm selected.
Name length must be less than 20.
ID number used must be 1 - 255.
While the name assigned is programmatically not of any use, the assigned name is displayed on the screen and makes object identification by the user easier. This feature can be enhanced by the user via a list implementation to store the names and ID numbers, thus allowing indexed name look-ups.
¶ Sample Code
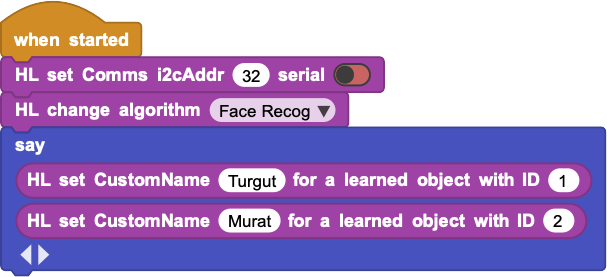
In the above example, we start out with two learned faces in the Face Recognition algorithm, with ID numbers 1 and 2.

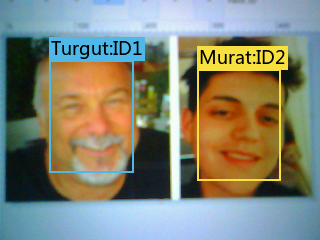
Upon execution of the sample program, the left face with ID number 1 is assigned the name "Turgut" and the right face with ID number 2 is assigned the name "Murat". Camera display shows the new designations for the two faces.
¶ HL learn as ID and NAME

This block is a shortcut block that does two things at once:
- it learns the currently recognized object with an assigned ID number
- and it assigns it a name at the same time
Name length must be less than 20.
ID number used must be 1 - 255.
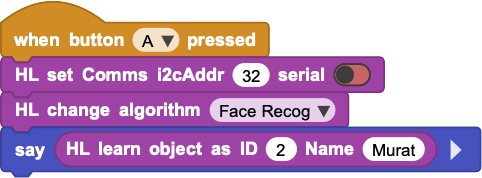
Using this block is the equivalent of using the blocks:

It is a quick way to learn and name many objects back to back programmatically.
¶ Sample Code
¶ What is the HuskyData?
HuskyData is a list variable that contains data details of requested objects from the camera. One can think of it as the packet of response that is sent back from the camera for each request it processes.
¶ An example of HuskyData, after a Blocks request


¶ An example of HuskyData, after an Arrows request


For each request made, HuskyLens sends back a packet of response that includes the following information:
- First group of information sent is called Info Data.
- This is followed by either a set of Block Data, if a Blocks request was made;
or a set of Arrow Data, if an arrow request was made.
In a MicroBlocks program, this information is stored in the HuskyData variable.
Let's break down the HuskyData information blocks:
¶ Info Data
Info Data contains 3 pieces of information:
- Object Count : Numbers of blocks or arrows
- Learned Count : Numbers of learned blocks or arrows
- Frame Number : Current Frame Number
¶ An example of Info Data:

| Data | Description |
|---|---|
| I 2 8391 |
indicates that this is Info Data. means numbers of blocks or arrows learned is 2 is the frame number |
¶ Block Data
Block Data contains 5 pieces of information for each block:
- X center of block.
- Y center of block.
- Width of block.
- Height of block.
- ID number of block.
¶ An example of Block Data:

| Data | Description |
|---|---|
| B 84 132 65 112 2 |
indicates that this is Block Data X center of this block Y center of this block Width of this block Height of this block is ID number of this block |
¶ Arrow Data
Arrow Data contains 5 pieces of information for each Arrow:
- X Origin of arrow.
- Y Origin of arrow.
- X Target of arrow.
- Y Target of arrow.
- ID number of arrow.
¶ An example of Arrow Data:

| Data | Description |
|---|---|
| A 192 132 88 14 1 |
indicates that this is Arrow Data X origin of this arrow Y origin of this arrow X target of this arrow Y target of this arrow ID number of this block |
¶ Program Assisted Object Learning
Due to the real-time or LIVE nature of the MicroBlocks environment, it is possible to do the algorithm training using the library blocks, right on the IDE. This eliminates many confusing button presses on the camera, as well as combining learning and name assignment phases into a single step; making the end result simpler and more productive.
HuskyLens magic is totally dependent on Learned Model Data. The product provides some of that in the original package under Object Recognition (20 Objects). Another group of 587 APRIL Tag images are provided as part of the Tag Recognition. However, the tags are not pre-learned and the user has to train the camera with the tags of interest for any project use.
¶ Manual versus automated
The process to train HuskyLens with any data is rather arduous, due to the requirement of combinations of button presses on the the camera's top edge. It takes quite a bit of time to get the hang of it.
Please refer to DFRobot product WIKI for the details of this process, as well as the specific requirements for the various algorithms and their option settings.
Here, we would like to provide a method for an easier way of achieving the training for various algorithms. Note that you can combine the manual process described by DFRobot and the methods described here, as long as you are aware of the limitations imposed by the various algorithms.
The data learned by an algorithm constitutes a "Trained Model Data", and can be saved to the SD Card on the camera. These trained model data files can also be loaded whenever desired under program control, giving the user the ability to switch model data sets.
It is important to remember that different algorithms have certain restrictions or limitations as it pertains to learning objects.
It is highly recommended that for any actual project use, the algorithm data be trained in the actual setting of the project. This will eliminate any recognition errors based on the background differences.
¶ Blocks used
There are several blocks in the library that are meant to be used in the Learning / Training phase with the camera.

Normally, these would be used one block at a time, by clicking on them, in the context of training a specific algorithm.
¶ Basic Learning / Training Process
NOTE: All steps below assume that you have set the communications protocol and selected an algorithm to work with.
We will cover the basic training flow for the algorithms.
A high-level process is as follows:
- Select an algorithm
- Delete all learned data (optional)
- Delete all assigned names (optional)
- Train with new objects
Let's see what is involved at each step.
1. Select an Algorithm:
There are seven algorithms, but only six that can be trained with user data. The Object Recognition is already pre-trained with 20 classes of objects.
Algorithm selection is accomplished with the HL change algorithm block:

Face Recognition, Line Tracking, and Object Tracking are probably the most popular algorithms for the various projects. Color Recognition is probably next in popularity. All these, as well as Tag Recognition, are algorithms that are meant to learn single/multiple objects, and can detect multiples at a time.
Object Classification, on the other hand, learns single/multiple objects, but detects single objects.
2. Delete all learned data (optional)
For any given algorithm, all previously learned data can be erased, if so desired. This enables one to start with a clean slate. Also, this step is totally optional. If not deleted, previously learned data persists and subsequent learning activity adds to the algorithm's data model.
If all learned data is NOT going to be erased, it will necessary to find out "how many learned objects are present for a given algorithm." This can be done with a combination inquiry as shown below:
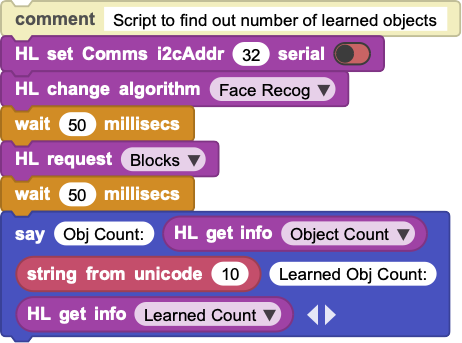
It is a good practise to use and assign sequential ID#s in the training process. This ensures that Learned object count inquiries and the number of actual learned objects match.
Data deletion is accomplished with the HL do block and Forget Learned Objects option:

3. Delete all assigned names (optional)
Even though it is not a requirement, it is possible to assign names to learned objects, in addition to the IDs they acquire in the learning process. This information is programmatically not of any use, but it makes the identified objects easier to recognize via their assigned names.
During a training session, it is easier to assign names, if the previously assigned names are all erased. This eliminates any confusion on the camera's part.
Name deletion is accomplished with the HL set customName block:

This block, if used with a blank name, will erase the assigned name for the object ID specified.
In order to erase all assigned names for an algorithm's objects, we need to use a looping script and apply the block command to each ID#. An example script is provided below:
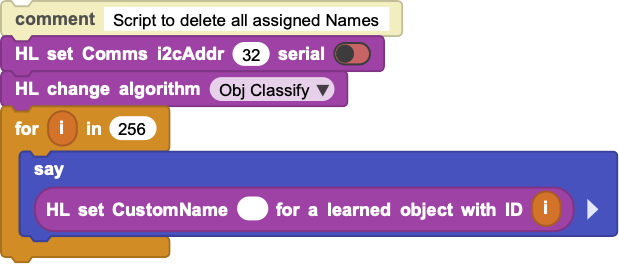
4. Train with new objects
Finally we are at the step that actually trains the algorithm and creates the learned model data.
As mentioned earlier, in this step, it is important to use sequential ID#s to be assigned to the learned objects. ID#s should start with 1 and increment by 1, for each object to be learned.
It is also possible to assign a name to a learned object. This step can be combined with the learning step and can be done in a single command cycle. Below, we will provide two scripts; one without a name assignment, and one with the name assignment:

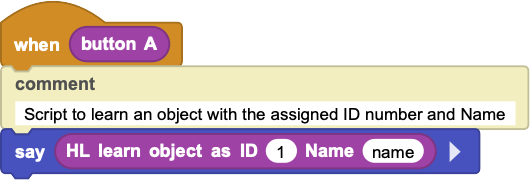
REMEMBER to set a communications protocol and select an algorithm prior to using these blocks !!!
In the scripts above, we have used the button-A as an event driver for the training process. You need to setup your images that will be used for the training, and then press button-A continuously while training a selected object ID# and (optionally) name. When you release the button, the object with ID# will be learned, and if used, the selected name will be assigned to it.
If you have more than one object to learn, then you can repeat the process after modifying the ID# and Name of the next object to be learned. You press the button A continuously again, and learn another object.
If you make any mistakes, you can start over again, and repeat steps 1-4.
Once you complete the training proces for an algorithm, you can save its learned model data to the SD card on the camera. This will enable you to access it later on. Also, it may be helpful in recovering from errors, when you already have a good set to start with.
Once you try the manual learning process and the automated programmatic version, you will come to appreciate the simplicity of the automated version.
Remember that all Learned Data, Object ID#s and Names are per algorithm selected. Make sure you are operating with the correct algorithm and assigning ID#s that are incremented from the previous training sessions.
¶ Helpful Tips, Comments and Limits
The implementation details of this library is based on the HuskyLens Arduino specifications in the Github page (https://github.com/HuskyLens/HUSKYLENSArduino).
It is not possible to do anything other than what is inherently allowed in the HL specification. We simply provide an easier and more user-friendly interface to the product features. By accessing the feature-set via a block interface, one eliminates the complexities of the text-based programming paradigms.
MicroBlocks provides an event driven environment that can be harnessed to achieve things normally much more complicated or even impossible to code in an Arduino-like environment. This will allow the user to create projects that are more integrated with their project environments.
Please keep in mind that, for simplicity and ease of learning reasons, the examples provided with the individual commands are mostly static and driven by button presses. However, the actual use of the camera will most likely be based on a manually controlled or a moving platform; eg: a robotic car. This will necessitate that the commands used to detect and action various objects will need to be processed in a continuous program loop. Therefore, users should start learning by coding actions based on button presses and refine them until the desired results are achieved. Later, these can be incorporated into programmed loops to achieve a more real-time processing of images. This last step will be much facilitated by the real-time event driven nature of the MicroBlocks environment.
Learning / Training of objects for all algorithms are done controlled by a camera setting. For all algorithms, except Object Tracking, there is the option setting for Learn Multiple. If enabled, it will allow the algorithms to learn and recognize more than one object. Otherwise, only a single object is learned.
For Object Tracking, there is only a single learn possibility, due to the way the algorithm functions. However, there is an option Learn Enable that controls the continuous learning of the object while it is being tracked.
Once the object is learned and the tracking process is active, the display will identify the object as Learning:ID1. This means that while the camera is tracking the learned object, it keeps on learning and improving the ability to identify it. When you are satisfied with the results, you can turn off this setting. Make sure you adjust the size of the frame by setting Frame Ratio and Frame Size to match the shape of the object to be tracked.
For newcomers to the HuskyLens, Learn Multiple option is the cause of many headaches, as it defaults to NO and prevents multiple objects from being recognized.
Camera display is a very handy feature of the HL. It allows one to display project relevant information on the screen without interfering with the AI operational features of the camera. Specially, having a display device available as one starts to advance towards untethered operational modes is of great value. One much asked question regarding the camera images is the ability to transfer them to other devices. This is not supported by the current implementation specifications. It is possible to save video frames with and without user annotations, to the internal SD storage. It may be possible to read and send these images to other devices using any communications means available. However, this will require quite a bit of custom development and may not even be possible within the realm of some processor environments due to memory and processing limits.
Object Naming is an interesting feature that aids in identifying learned objects. However, DFRobot implementation of this feature does not provide a way to make any use of the object names programmatically. One can overcome this limitation by implementing a list that correlates the object names and their learned ID numbers, thus allowing for better use of the assigned names.
Microcontroller platform selection is an important decision when working with this product. While many examples are Arduino UNO based, Arduino is not necessarily a suitable platform due to its limited external communication capabilities. One would do much better using a Radio, WIFI, or Bluetooth capable platforms (ESP32, RPI Pico2040, micro:bit v2) for any specific project. Using a communications capable platform makes it possible to integrate one's projects with other external project components and enhances the value of the efforts spent. Also, memory wise, using 32-bit processors gives one more flexibility in implementing projects.
Model import and export is an important feature with AI driven projects. Unfortunately, DFRobot specifications do not allow any externally trained models to be integrated to the HL product. This limitation restricts the user to a very tedious learn-cycle on the camera hardware itself. While the learned object sets for the various algorithms can be saved to the SD storage of the HL, it is not possible to change them afterwards by editing, adding, or subtracting learned objects. This is probably the most mentioned deficiency in the product support forum. And it severely restricts the use-cases for the product.
Factory Reset is an option that can be used when camera settings result in unexpected behavior of the camera. It will reset all options and delete any learned objects.
Regardless of the issues mentioned here, HuskyLens is an exciting product to dive into the world of AI based image processing, and learn and experiment with what one's imagination allows.