¶ WTS Logger (WIFI)
¶ Overview
Many of today's microprocessors do not have any type of built-in screens that are capable of displaying messages.
This makes it hard to work with them while trying to develop software.
The WTS Logger is a bundle that aims to make dealing with this problem a bit easier. It consists of:
- a MicroBlocks library that enables the user to log messages from a WIFI capable micro device,
- and an Android mobile device App that receives and displays the messages on the mobile device's screen.

Description
WTSLogger
and Messages
Related
Files
The main system components are described below:
¶ #MicroBlocks Components
WTSLogger Library
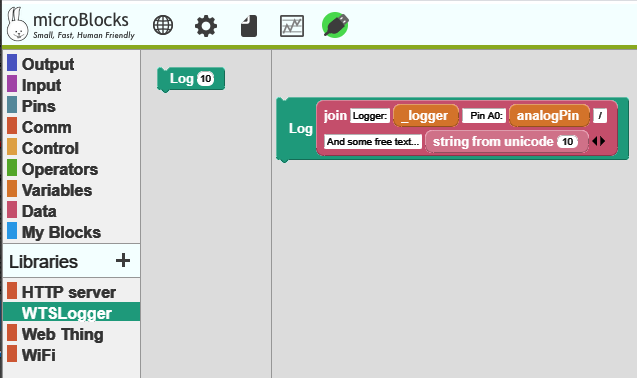
WTSLogger.ubl is a code written in microBocks that provides the interface to log messages to the mobile device.
Log blocks are inserted into the microprocessor user program at places where message displays are desired.
¶ Android Component
WTS Logger Android APP
WTSLogger.apk is the mobile component. It is written in App Inventor.
It establishes a WIFI connection to the microprocessor device and retrieves the messages programmed and displays them on the mobile device’s screen.
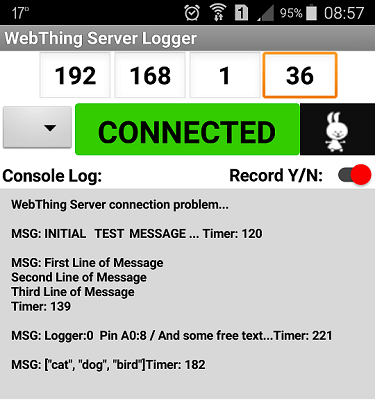
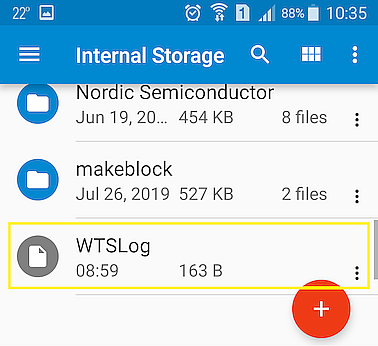
In addition to being able to display the messages, the mobile App component is capable of writing out the messages to a standard system text file on the Android device. This file can be found in the main directory under the name WIFILog.
WTSLog gets created whenever the “Record Y/N” switch is selected and messages are appended to it as long as the switch is on.
When the file is not needed or a new file is desired, simply delete or rename the existing file on the mobile device and continue.
Message recording can be turned on / off as desired and can be controlled for each message.
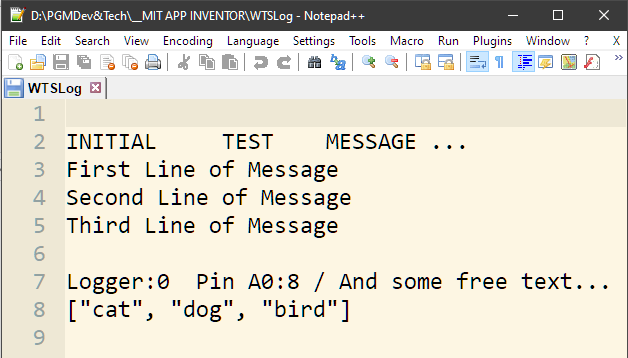
Following images show the recorded log in the Android directories and also a sample content.
WTSLog in Android Storage:
WTSLog Content:
In order to use the WTSLogger, you need to do the following:
¶ In microBlocks IDE:
-
Load the WTSLogger library:
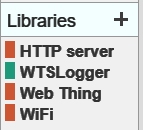
-
Declare a minimal WebThing Server using the blocks:

Fill in the SSID and Password for your WIFI environment.
-
When the WebThing Server is started, it will log onto the WIFI network and obtain an IP address. Make a note of this displayed IP address. You will need to enter it into the Mobile App. If you don’t catch it in time, you can always display it again by clicking on the “IP address” block of the WIFI library.

NOTE: Your IP address will most likely be a different one.
-
Before the first LOG block use th efollowing block once only:

-
Use the LOG block and compose your messages:

-
As your MicroBlocks program runs, it will display the messages on the mobile device screen.
¶ In the Mobile Device:
- Install the WTSLogger.APK
Note: You need to sideload this component by transferring it to your cell phone and then installing it. Since it is not a signed app, you might need to enable the Security Configuration Option “Install from Unknown Sources”.
-
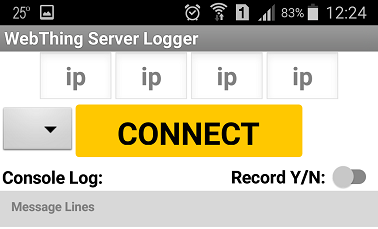
Run the App. You should see the following screen:
-
On the main screen, enter the IP address you obtained from your microBlocks IDE.
-
Press the CONNECT button to initiate a connection to the WTS device.
-
If all goes well, you should see the CONNECT button change to a green CONNECTED button, and see the microBlocks bunny start hopping up and down next to it. That means you are now connected and ready to receive your messages. Your mobile APP screen should look like this:
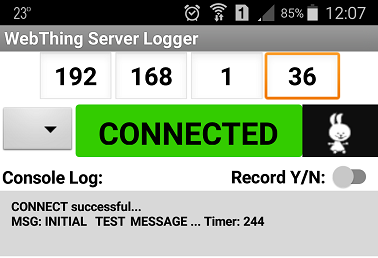
NOTE: your IP address will most likely be a different one.
TIP 1:
The mobile APP will display a Timer figure for every message it receives. This indicates how long it took to poll, receive, and process the message.
To the left of the CONNECT / CONNECTED button, you will notice a dropdown selector box. This is used for adjusting the PollDelay parameter for the APP.
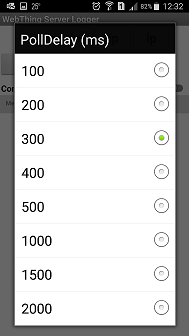
It defaults to 300ms when the program starts. Depending on the Timer values you see, you might be able to benefit from adjusting this number accordingly. However, it should NEVER be lower than the average Timer values you will see displayed.
If you are in very close proximity to your WIFI device, you might see very low Timer values below 300ms. In that case feel free to experiment with 200 or 100ms values; remembering not to get lower than the displayed Timer values.
If you are accessing your WIFI device from afar, you might experience Timer values higher than 300ms and a bunch of erratic behaviour to go with it. These will include partial messages, repeating message displays, etc. All these basically indicate that the DEFAULT interaction between the WIFI device and mobile device is not optimal. In that case, adjust the PollDelay value to a higher one and test.
TIP 2:
From time to time your mobile device screen will fill with messages. While you can scroll the display to see the messages below the bottom edge of the screen, it might be easier to just clear the message display area and continue. You can do this by simply pressing the CONNECTED button again. It will automatically disconnect and reconnect to the WIFI device and continue the message displays.
TIP 3:
From time to time the WIFI device and the mobile device might get out of synch with each other, or experience one of many WIFI related mishaps and lose communication. Your WIFI device also may do auto RESTARTS due to some internal condition.
If you see that your messages are NOT displaying as expected, you can simply RESET the WIFI device by pressing the RESET button on it. This will restart the WIFI process and rerun your microBlocks program.
When the WIFI device restarts, your APP display will change from CONNECTED to CONNECT, until it reconnects with the WIFI device again. If this happens, you will see the button status change to CONNECTED, as well as the hopping bunny.
At this point you will also notice a heartbeat LED pattern on the WIFI device: a 4sec ON followed by a 200ms double blink. That means everything is running OK.
If things are not as described, it does NOT hurt at all to RESET the WIFI device and to RERUN the mobile APP.
TIP 4:
Depending on the specifications of the WIFI device you are working with, the message sizes you will be able to display will range from a few bytes to about 1000 bytes. I was able to achieve 900 bytes on an ESP8266 device. Your mileage may wary.
This is due to the tight memory availability in these devices. Together with the microBlocks VM and the user code, sometimes there is not much space left for long strings of messages.
Fortunately one can experiment easily by generating messages of desired long lengths to test, and then see what the results are like. Also, microBLocks IDE will display an error message indicating it could not load the string to the WIFI device.
TIP 5:
Since most local WIFI networks operate via DHCP to dish out the local iP addresses, the IP address one gets assigned will NOT always be the same. Even between connections, one can experience a change of the assigned IP address during testing. All these conditions are based on the ROUTER DHCP configuration settings.
As such, it is very important to verify your IP address before you start operating in an untethered fashion with the WIFI device. Also, if you change WIFI devices during testing, you may experience different IP address assignments.
Just make sure you know the IP address of the WIFI device and link to the correct address from the mobile APP.
You will see that once connected, the mobile APP will maintain your entered IP and keep trying to reconnect to it automatically.
TIP 6:
While the use case demonstrated here is based on access to a user’s WIFI network, the setup will also work using a microBlocks HOTSPOT technique. Instead of logging into the WIFI network, use the “create hotspot” block from the WIFI library to establish your own server instance with it’s own SSID and IP. Then you can log into this hotspot SSID with your mobile device and achieve the same kind of interaction for logging messages.
APP Messages
There are few status and error messages displayed by the mobile APP, informing you of how things are going.
| Message | Description |
|---|---|
| CONNECT successful | APP was able to establish a connection to the WIFI device. At this point you will also notice a heartbeat LED pattern on the WIFI device: a 4sec ON followed by a 200ms double blink. That means everything is running OK. |
| ERROR in IP detected | the IP address entered is not proper (values are not between 1 and 255). |
| WebThing Server connection problem | APP is not able to connect to the WIFI device. This could be due to a temporary error, a device restart, or an out of synch condition, etc. Wait a bit and click CONNECT again. If the connection does not establish, try restarting both ends one at a time. |
Misc. Messages: There are a few WIFI IO related errors and debugging messages that are not very frequent. Please check the APP source for exact details.
¶ Technical Information on the Mobile APP component
WTSLogger APP is written in MIT App Inventor 2 (AI2) and, just like microBlocks, also makes use of block paradigm for coding. App Inventor details can be accessed at App Inventor.
AI2 environment is capable of creating stand-alone Android APPs that can either be downloaded to the user’s PC as an APK file, or loaded to a mobile phone using a QR code generated specifically for the APP.
Since the APPs generated by AI2 normally are not signed, when installing them to a mobile device one needs to enable the Security Configuration Option “Install from Unknown Sources”.
AI2 program development is done in the AI2 IDE on the PC, in tandem with the mobile MIT AI2 Companion APP on the cell phone.
Program media resources (eg: hopping Bunny GIF file) are loaded onto the mobile device, and are accessed in one of two ways depending on the stage of the development:
-
During the development phase, the program needs to refer to the location of the files under the directory:
file:///mnt/sdcard/AppInventor/assets/dancingBunny50x50.gif

-
During the APK generation phase, the program needs to refer to the location of the files under the directory:
file:///android_asset/dancingBunny50x50.gif
This is accomplished by use of the block:

The incorrect setting of this resource location will have the unfortunate effect of NO “hopping bunny” being visible when running the APP.
So just before creating your APK file, make sure to assign the correct file location.
Just a quick FYI regarding HTTP calls:
HTTP interactions of the APP are done using the WebViewer block. Both GET and PUT transactions are handled by this block. WebViewer block, upon completion of the transaction, executes the WebViewer.GotText code.
Since all transactions end up in this block, there needs to be a way to distinguish which actual transaction any particular entry into this code block represents. My simple way to accomplish this task was to create a variable called “callStage” and assign a particular value to it before each WebViewer block use.
This way, when in WebViewer.GotText block, I can check the “callStage” value and determine which call’s return I am processing, and act accordingly.
