¶ RADIO To USB Logger
By Turgut Güneysu
¶ Overview
Many of today's microprocessors do not have any type of built-in screens that are capable of displaying messages. This makes it hard to work with them while trying to develop software.
The RADIO Logger is a bundle that aims to make dealing with this problem a bit easier. It consists of:
- a microBlocks library that enables the user to log messages from a RADIO capable micro device,
- a micro:bit program that acts as a Radio relay,
- and an Android mobile device App that receives and displays the messages on the mobile device's screen.

RadioLogger
and Messages
Related
Files
The main system components are described below:
¶ MicroBlocks Components
RADLogger Library
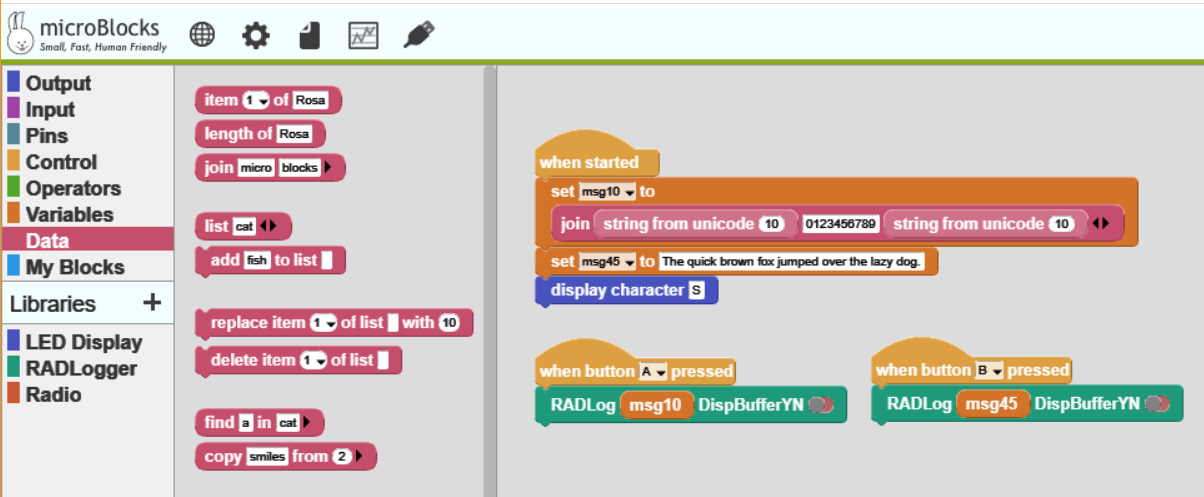
RADLogger.ubl is a library written in MicroBocks that provides the interface to log messages to the Android mobile device.
RADLog blocks are inserted into the microprocessor user program at places where message displays are desired.
RAD2USBSEND.UBP is a MicroBlocks demo program that shows how to use the library.
¶ micro:bit Relay Component
Radio2USB Relay Program
microbit-Radio2USBRelay.hex is a micro:bit program written in MakeCode of MicroSoft.
It runs in a micro:bit device, listens to radio messages on Group 255, and relays them to the Android mobile device it is attached to. The connection to the Android device is via an OTG cable. The cable connects the USB port of the micro:bit device to the USB port of the Android mobile device. The default connection speed is at 115200 baud. However, other speeds down to 1200 baud can be selected using the A and B buttons on the micro:bit.
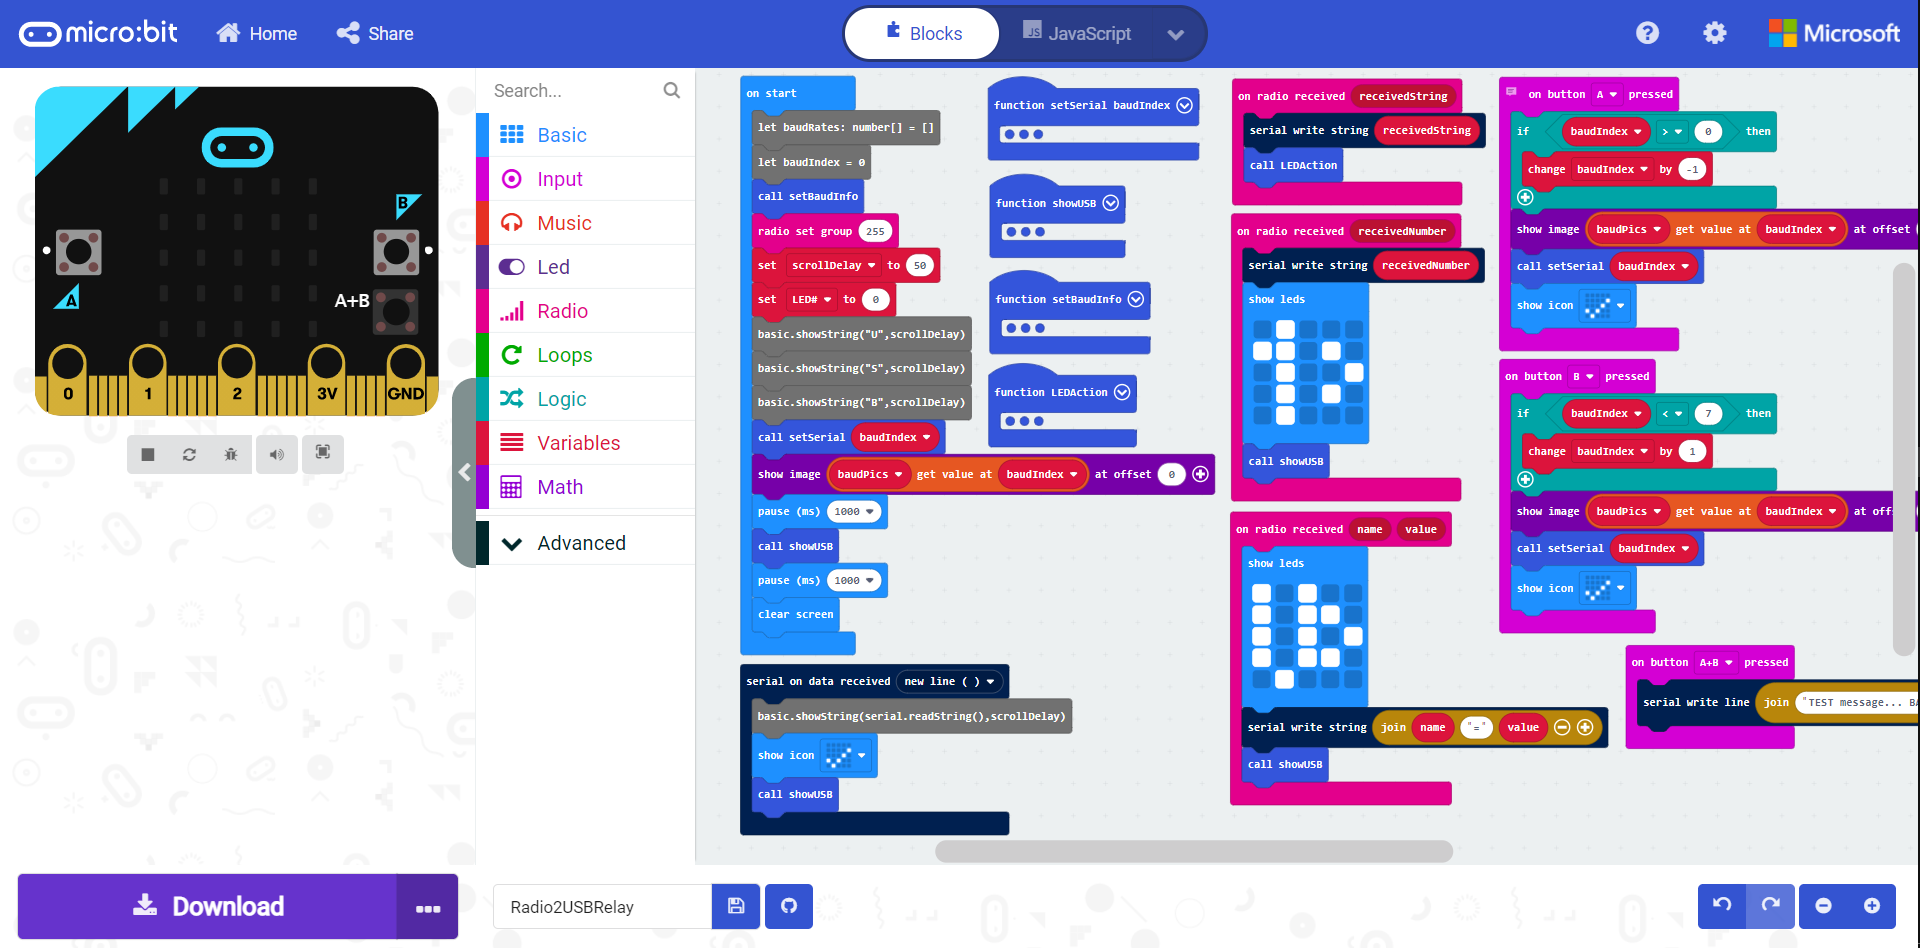
The reason this program was developed in MakeCode is because it allows detailed control of the USB interface and pins at user code blocks level. Thus it was possible to develop the code without resorting to lower level system programming interfaces. This way, anyone can modify the program as it suits their needs.
¶ Android Component
RAD2USBLogger.apk is an Android APP and is the mobile component written in App Inventor.
It establishes a USB Serial connection to the microprocessor device over the OTG cable and retrieves the messages programmed and displays them on the mobile device’s screen.
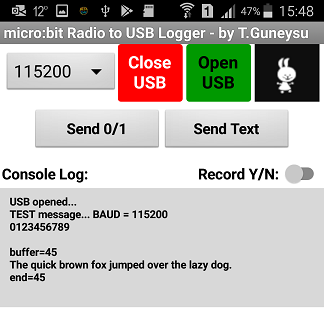
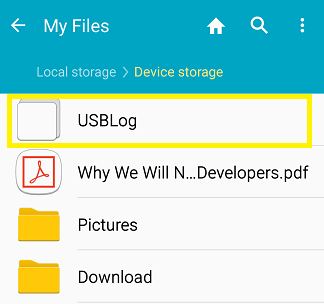
In addition to being able to display the messages, the mobile App component is capable of writing out the messages to a standard system text file on the Android device. This file can be found in the main directory under the name USBLog.
USBLog gets created whenever the “Record Y/N” switch is selected and messages are appended to it as long as the switch is on.
When the file is not needed or a new file is desired, simply delete or rename the existing file on the mobile device and continue.
Message recording can be turned on / off as desired and can be controlled for each message.
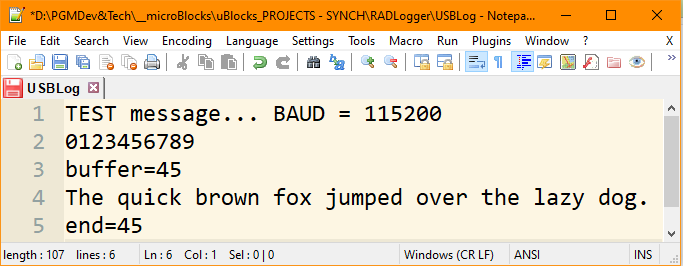
Following images show the recorded log in the Android directories and also a sample content.
USBLog in Android Storage:
USBLog Content:
¶ OTG Cable
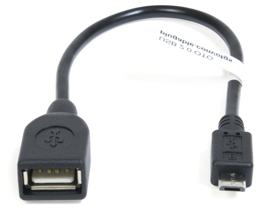
The OTG cable provides a way to connect the micro:bit device that acts as the radio relay to the Android mobile device.
The particular cable shown here is only an example. Depending on your phone model and its USB specifications, you will need to locate a cable that fits both the micro:bit device and the phone correctly.
In order to use the RADLogger, you need to do the following:
¶ In microBlocks IDE:
-
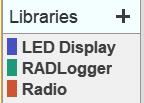
Load the RADLogger library:
-
Use the RADLog block and compose your messages:

-
As your microBlocks program runs, it will display the messages on the mobile device screen.
-
To make things simple, we have provided a sample program that you can use to test out the RADLogger: RAD2USBSend.ubp
This program has the micro:bit buttons programmed to send out various length messages.
¶ In the micro:bit device to be used as the Radio relay:
-
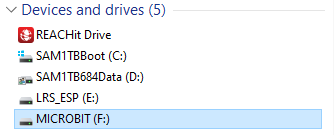
Attach the micro:bit device to your computer via an USB cable. It should show up in the Windows File Manager display as a device named MICROBIT.
-
Drag and drop the microbit-Radio2USBRelay.hex file onto this MICROBIT device.
-
Once the file is downloaded on to the micro:bit device, unplug the cable.
-
Using the OTG cable, attach the micro:bit device to the Android phone you will be using.
¶ In the Android Mobile Device:
- Install the RAD2USBLogger.apk
Note: you need to sideload this component by transferring it to your cell phone and then installing it. Since it is not a signed app, you might need to enable the Security Configuration Option “Install from Unknown Sources”.
-
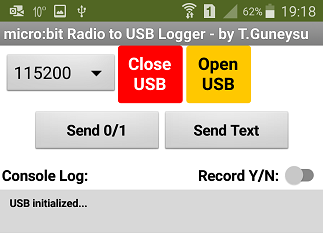
Run the App. You should see the following screen:
-
Make sure the micro:bit device that will act as the Radio relay is attached using an OTG cable, and has the microbit-Radio2USBRelay.hex program loaded.
-
If you see “USB initialized: message displayed, press the Open USB button to initiate a connection to the USB Port and the attached micro:bit device.
-
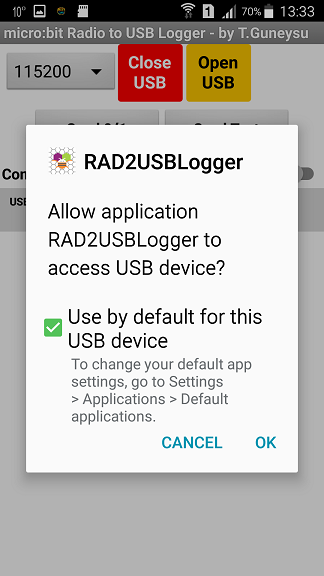
Since the connection of the micro:bit device to the Android Mobile is via an OTG USB cable, the micro:bit device is detected as a storage device. To enable the communication between the micro:bit and the Android mobile device, the Android OS will display a message asking for permission for the APP to access the micro:bit device. You will have to OK this message to make the communication possible.
Sometimes, you might have to press the Open USB button again to activate the USB connection.
-
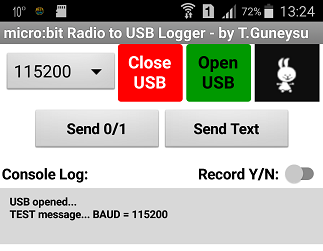
If all goes well, you should see the Open USB button color change to green, and see the microBlocks bunny start hopping up and down next to it. In the console Log area, USB opened… message will display. That means you are now connected and ready to receive your messages. Your mobile APP screen should look like this:
-
To verify your connectivity, you can press the “Send 0/1” or the “Send Text” buttons on the APP screen. These will send out a short 0 / 1 or test message respectively to the attached micro:bit device. You should see these displayed on the micro:bit display.
-
Alternatively, you can press the A & B buttons of the micro:bit device together in order to send a test message from the micro:bit device to the Android App. This will also be displayed on the APP screen as “TEST Message… BAUD = 115200”
¶ TIP 1:
The micro:bit Radio relay device connected to the Android Mobile device via an OTG cable operates at 115200 baud by default. However, the USB connection speed between the devices can be adjusted to selected values between 115200 and 1200 baud.
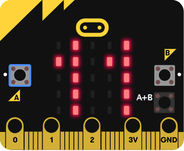
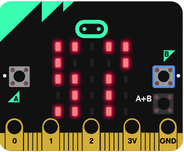
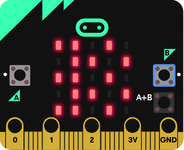
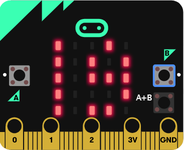
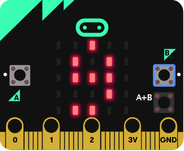
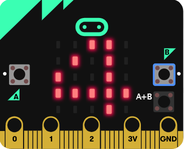
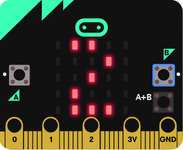
The speed adjustment is done using the A and B buttons of the micro:bit device. Every press of the B button will lower the USB speed, and every press of the A button will raise the USB speed. Each selected speed will be displayed on the micro:bit display followed by a check mark display. That means, the speed has been set.
Here are the displays showing the various baud rates that can be selected:
| 115200 | 57600 | 38400 | 19200 |
|---|---|---|---|
 |
 |
 |
 |
| 9600 | 4800 | 2400 | 1200 |
|---|---|---|---|
 |
 |
 |
 |
After setting the micro:bit speed, you should also set the Android APP speed to the same setting using the speed selection menu of the App.
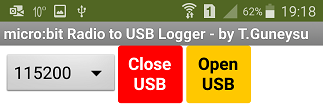
Once both devices are set to the same speed, you can press the A&B buttons on the micro:bit device to send a test message to the Android App. It will display “TEST message… BAUD = speed, where speed is replaced by the actual selected speed.

¶ TIP 2:
From time to time your mobile device screen will fill with messages. While you can scroll the display to see the messages below the bottom edge of the screen, it might be easier to just clear the message display area and continue. You can do this by simply pressing the Close USB and Open USB buttons in a row. It will automatically disconnect and reconnect to the Radio relay device and continue the message displays.
¶ TIP 3:
From time to time the micro:bit device and the Android Mobile device might get out of synch with each other, or experience one of many USB related mishaps and lose communication.
If you see that your messages are NOT displaying as expected, you can simply RESET the micro:bit device by pressing the RESET button on it. This will restart and rerun your microBlocks program.
You can also terminate and rerun your Android Mobile App anytime you want. Just remember to OK the USB device permission message when displayed.
¶ TIP 4:
In the Android environment, the connection of a USB device via an OTG cable causes the Android OS to automatically execute any programs previously associated with the USB devices, eg: File Managers, Media Managers etc.
This might be a confusing activity when you attach the micro:bit device to the Android Mobile. If any other programs pop up, you can simply discard them by closing them.
Depending on your Android environment settings, if you do not like these extra actions, you can turn off the associated APP’s storage permissions off.
¶ TIP 5:
Radio messages in the micro:bit world are limited to 19 bytes. However, when you compose RADLog messages, you can create them to be any length you need them to be. The RADLog library block will correctly dissect any long messages into 19 byte chunks and send them in succession. They will be reassembled at the destination, giving you the result you intended to achieve.
All message content will be sent as STRING. Non String data types (boolean, list, and number) will be converted to String type. Booleans will be changed to true / false, lists will be changed to strings separated by commas.
¶ TIP 6:
As mentioned in Tip 5 above, messages are split up into small groups and sent over the radio interface. In order to achieve any type of formatting, it is up to the user to make use of LF (0x0A) characters or the  block to break up display of messages at the desired points in the message stream.
¶ APP Messages
There are few status and error messages displayed by the mobile APP, informing you of how things are going.
| Message | Description |
|---|---|
| USB initialized | APP was able to set the USB port settings successfully. |
| USB did NOT initialize | APP was not able to set the USB port settings. |
| USB opened | USB connection established. |
| USB did NOT open | USB connection did not work. |
| USB closed | USB connection closed. |
| Denied: WRITE_EXTERNAL_STORAGE | Permission to access storage device not granted |
¶ Technical Information on the Mobile APP component
RADLogger APP is written in MIT App Inventor 2 (AI2) and, just like microBlocks, also makes use of block paradigm for coding. App Inventor details can be accessed at App Inventor.
AI2 environment is capable of creating stand-alone Android APPs that can either be downloaded to the user’s PC as an APK file, or loaded to a mobile phone using a QR code generated specifically for the APP.
Since the APPs generated by AI2 normally are not signed, when installing them to a mobile device one needs to enable the Security Configuration Option “Install from Unknown Sources”.
AI2 program development is done in the AI2 IDE on the PC, in tandem with the mobile MIT AI2 Companion APP on the cell phone.
Program media resources (eg: hopping Bunny GIF file) are loaded onto the mobile device, and are accessed in one of two ways depending on the stage of the development:
-
During the development phase, the program needs to refer to the location of the files under the directory:
file:///mnt/sdcard/AppInventor/assets/dancingBunny50x50.gif

-
During the APK generation phase, the program needs to refer to the location of the files under the directory:
file:///android_asset/dancingBunny50x50.gif
This is accomplished by use of the block:

The incorrect setting of this resource location will have the unfortunate effect of NO “hopping bunny” being visible when running the APP.
So just before creating your APK file, make sure to assign the correct file location.
