What is a Library
Whenever we write code and find ourselves keep repeating a set of instructions or certain procedures, it might be helpful to code them once and convert the result into a Library, so that we as well as others can make use of it later by simply loading the Library and using it in our programs.
As such, a Library is a collection of code, usually focused on enabling a specific component, peripheral or functionality. The important thing that distinguishes a Library from a program is that a Library is a component or a building block that will be used in a program, but in itself it is not a complete program.
Libraries can be created either using the IDE of the particular language development environment or by writing code in the original source language that was used to create the IDE environment to begin with.
What Makes a Library
A good Library should:
- Have a specific purpose
- Implement a clean user interface
- Not do irrelevant things
To achieve the objectives listed above, we need to do some planning and thinking.
¶ PURPOSE
The Library should have a specific function to achieve a defined result.
In order to accomplish this, we need to think about the task at hand and make sure to reduce it to its single-most important functionality that will be captured in the Library. Whether it is actuating a piece of hardware, or performing some type of data manipulation; the Library purpose should be clear and concise.
¶ USER INTERFACE
The Library should implement a clean user interface.
This aspect is the most visible and important part of the Library. The users of our Library will interact with our code via the user interface and will judge its usability and clarity by it.
To organize the interface of our Library, we need to think of the inputs and outputs of our Library.
Inputs will constitute all the data we need from the users, in order to do what the library needs to do. These will be organized as input parameters for our Library.
And the outputs are what the Library will deliver as the result of it processing the inputs. Some Libraries just perform some operations that will result in something physical changing. Others will have a clearly defined value returned.
It is important to keep in mind that not all Library functions always return a value.
¶ RELEVANCE
The Library should not do irrelevant things.
Most Library codes start their life as a user coded custom block functionality. We realize we need a missing feature and write some custom blocks to remedy the missing feature. Then we decide that this would be helpful functionality to share, and decide to convert the custom blocks into a Library.
It is easy to get carried away and start adding more and more functionality to code. This leads to a very convoluted end result. It is best to plan what needs to be done and only focus the code to achieve that functionality.
Often it will be necessary to break down certain features and group them together to make up the Library. These will be presented as related function blocks that accomplish various aspects of the same original task.
A good example is the LED Display Library in MicroBlocks: It contains blocks for manipulating the LED panel as an aggregate, as individual LED pixels, and also has the ability to display letters and numbers.
MicroBlocks Library blocks have to be no more than 1000 bytes in length.
Let’s Write One
To keep things simple, we will focus on developing a simple Library using the IDE for MicroBlocks.
¶ PURPOSE
The functionality we want to achieve is:
- To enhance the default 17 byte Radio Messaging capabilities of the micro:bit devices by allowing messages of any size to be sent.
- We should be able to handle any type of data: strings, numbers, lists, and booleans.
- Optionally, if we are sending more than the default 17 byte messages, we should display the buffer count on the device LED panel.
This list is a good starting point for our Library definition.
¶ INTERFACE
Our Radio message block will be named RadioMsg.
To do the message processing, we need the user to give us a parameter that contains the message itself. The parameter will be named: msg and it will be a number/string input.
In order to determine the type of the message content, we can rely on the MicroBlocks “operator” block that reports the type of the input: ![]()
To satisfy the optional requirement for displaying buffer counts for larger than 17 byte messages, we are going to use a boolean switch as an additional argument. It will be named: ShowBuf and it will be using a boolean input field called bufYN.
Based on these initial input decisions, our block header will look like this:
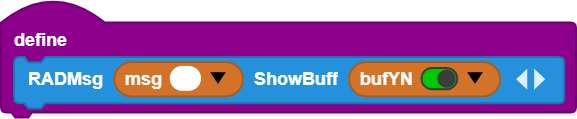
Since our objective is very simple, we will only need one block in our Library.
¶ CODE BLOCKS:
Now, let’s look at the code that we will need to do all the message processing. We will examine all blocks needed in groups and explain their functionality in detail.
We start out with defining some local variables.

Delay will be used to space out the buffers of the radio messages, so we do not overwhelm the radio transmission.
radMsgSize is used to determine each message’s maximum chunk size.
msgOut is set to the length of the message to be sent.
The next group of blocks looks at the message to be sent and determines its type, and converts it to a string format.
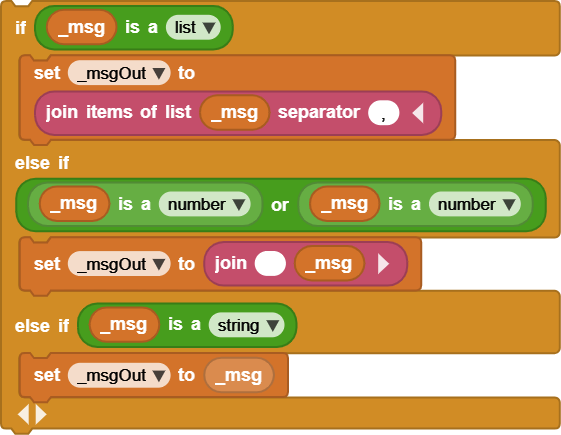
Lists become comma separated strings.
Numbers become numerical strings.
Booleans become true/false strings
We use the join items of list block to do the conversion.
We define some more local variables.

msgLen is the length of the converted message.
buff# is set to the number of 17 byte buffers we will need to send.
rem is the last message buffer size.
Now we are at the actual point where we start processing the message.
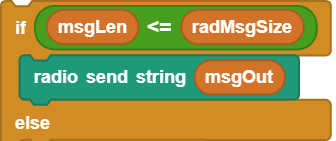
If the message to be sent is no bigger than our radMsgSize of 17 bytes, then we just send it out.
If it is larger than radMsgSize, then we use the calculated buff# variable as a loop counter to send each chunk separately.
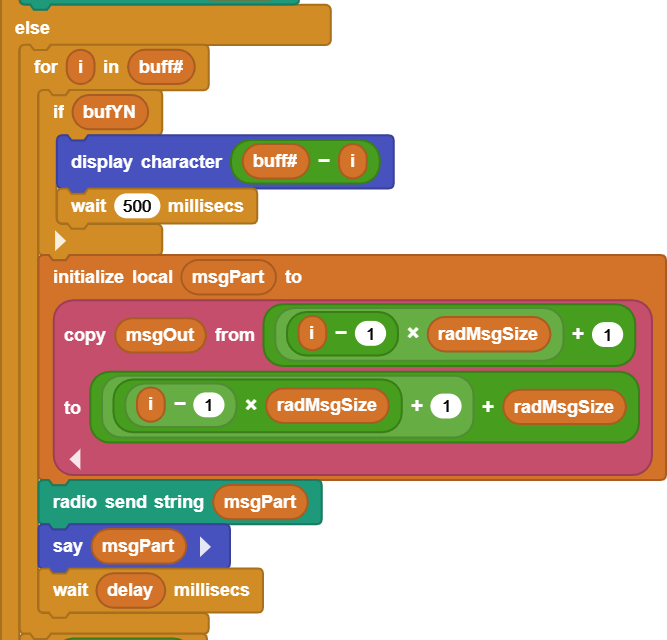
The optional parameter bufYN is checked to see if we need to display the buffer counts on the device LED panel. Whenever there is more than a single buffer of a message, this option is helpful in tracking the progress.
To split up a long message into radMsgSize chunks, we use the ![]() block to calculate a local variable msgPart and send out each chunk.
block to calculate a local variable msgPart and send out each chunk.
Once all the main buffers are sent, there still might be a remainder left over in the last part of the message. This is indicated by rem notequal 0 condition calculated.
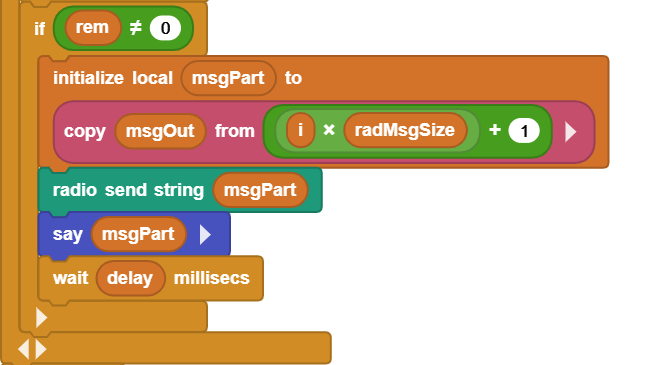
If so, we send out that last message fragment here.
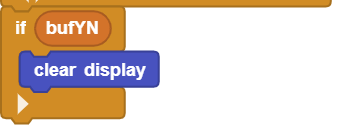
The last part of our code is to clear the device display if we were showing the buffer counts as selected in the optional parameter bufYN.
So this completes the code portion of our RadioMsg Library block.
Let's save our program so we don't have any acciddents and lose our work. We can use the name RadioMsg.UBP.
Now we need to move on to the part of making this code block into a MicroBlocks Library module.
¶ Converting to Library Format
Library modules are defined by the extension UBL.
We need to take our custom block we have coded and convert it into a file with the proper extension.
MicroBlocks actually provides us with the means to accomplish this very easily.


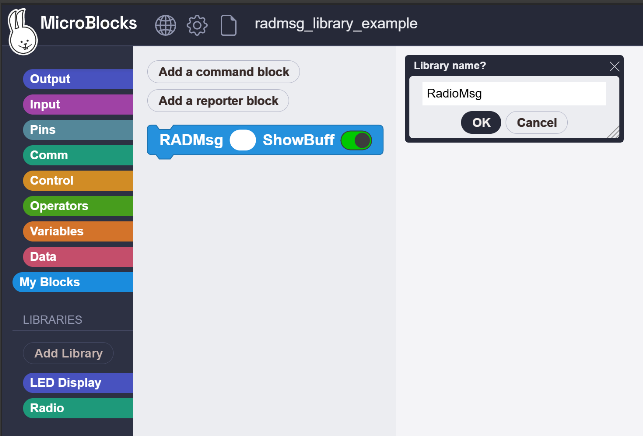
When we select the show advanced blocks option in the Settings Menu, we are presented with another menu item in the File Menu: export functions as library.
This option provides us a way to save the custom block we have created as a Library formatted file.
We enter the name for our Library “RadioMsg” and click OK.
We will be taken to the system file save dialog where we can place the Library file RadioMsg.ubl into a desired directory on our system.
Once this is completed, we will be able to go to the Libraries + section on the MicroBlocks IDE and load our Library from where we saved it directly into any program we wish.
By sharing the RadioMsg.ubl file, we will provide a way for other users to utilize our Library in the same way.
I hope you were able to follow this writeup and got enough information to try and create your own Library.
Don’t forget that there is also another way one can write Library code directly in the language in which the IDE was developed.
| Link | Filename | Description |
|---|---|---|
 |
RADMsg_Library_Example.ubp | Source code of the library example. |
|
RADMsg_Library_Receiver.ubp | Source code of the library receiver program. |
Once you create a library, it becomes necessary to keep it updated and possibly, over time, have various versions of it.
This section will help you achieve versioning of your library.
¶ Clarifications
First, a few comments on working with scripts meant to become libraries:
Let's start with our example program called RadioMsg.UBP
You don't have to export your custom blocks into a library to be able to test them.
Just use them in the RadioMsg.UBP program where you developed them and keep improving until they are ready.
¶ Saving Our Library
As we have done in the section above, when we are happy with the progress, we will save our library by "exporting" it with the help of the Files menu.
Phase #1:
During the export process you will be asked for a Library Name. This name will become the name that users will use when they load your library into MicroBlocks.
The export process shows a dialog and proposes the original program name as default: RadioMsg.ubp
Here, you may want to change the proposed name to the name you want for your library and definitely remove the suggested UBP extension.
So, we will keep our original name, RadioMsg; remove the extension UBP, and export it. Note that no extension is used in the save dialog.
This first step of the export process creates an export file from the original source program. It also makes an internal change to this file to designate it as a library file, and places the name you give it into the first line of the exported UBL file. More on that later.
Phase #2:
At the second step of the export, you will be asked for a system file name for your exported file on your PC disk. Let's keep this the same: "RadioMsg.UBL"
The UBL extension will be automatically assigned, indicating that this is a library file.
Note the differences:
- Your starting program was RadioMsg.UBP script file, where the extension is UBP.
- Your exported library file is RadioMsg.UBL. UBL extension meaning Library file.
Now we come to the process of making changes.
¶ Changing and Saving A Version of Our Library
Any time you want to change your Library, you should work with the file RadioMsg.UBP.
That is your original source and contains all your blocks.
Here you can make changes to existing blocks, as well as create new ones, as needed. And you can test them right there in the same program, without the need to export them.
When all is ready, and you want to make another version of your library, go through the export process:
- At the first step, you can keep the internal Library name the same: RadioMsg.
- At the second step of writing the library file to the PC disk, you can name it with a version number; eg: RadioMsg-v01.UBL
This process will make you end up with the following files:
ORIGINAL FILE: RadioMsg.UBP
Lib File: RadioMsg.UBL <-- first version you saved
Lib File: RadioMsg-v01.UBL <-- next version you saved and assigned a version number
If you want to test your library as a library, you start a new MB project and drag and drop any one of the RadioMsg.UBL files onto it. They will show up in the Libraries section and can be used in your code.

As you progress, you may decide that some of the older versions are no longer needed. So you can delete any of the earier UBL files; while creating new ones as needed.
NOTE: There are other ways one can edit library files and work with them. However, they require knowledge of what is in the UBP and UBL files, and familiarity with text version of the MicroBlocks program files.
While the process I have described above may be a bit elaborate, it is failsafe for a new MicroBlocks user:
- You will always have your original program.
- And you will always have your exported library versions.
- You can go back and forth and work with them without worrying about losing work.
After a few cycles and publihed libraries, we can start looking into other ways of doing library edits.
There is another useful method for adding new blocks to a library if you don't want to go back to the original project source.
Start by making a new project and importing the library you are working on. You do this by dragging and dropping the UBL file onto the IDE.
Create and test your new blocks in the "My Blocks" category.
Now comes the magic part:
-
If not already displayed, right-click on any new custom blocks developed and select "show block definition". Alternatively, you can right click on the My Blocks category name and select "show all block definitions."
-
drag the displayed block definition for each new block (i.e. the block definition is the stack of blocks with a purple hat block on top) and drop it onto the name of your library in the palette. The block will disappear from "My Blocks" and appear in the library!
Here is a depiction of this process, using a test library called "my TestLib".
It has two blocks: myBlock1 and myBlock2.

We create a new block for it called myNewBlock in My Blocks category.

We then select the "my TesLib" by clicking on it.
Then we drag and drop our newly created block onto the Library Name in the left side Libraries menu.

This adds the new block to the library and deletes it from the custom blocks section My Blocks.

When you are ready, you can re-export your library with a new version number. You can keep multiple old versions in case you want to go back to one of those versions.
NOTE:
It is extremely important that, while you drag and drop your newly created block onto the Library Name in the left side Libraries menu, you position the mouse pointer exactly on top of the Library name listed in the library menu. It will not be sufficient if the copied script simply overlaps the Library name listed in the library menu - the MOUSE needs to be inside it.

¶ Color changes to Guide you
As you follow the example above, you should be aware of the block color changes. These are helpful in following the process.
When you load the "my TestLib", the library name in the menu, its blocks are green. The Library color depends on what functionality the blocks provide, and usually are assigned by MicroBlocks Developers, as they are incorporating the library into the IDE. Different Libraries will be in different colors.
When you create your new custom block under the My Blocks category, the newly created block is the same color as the My Blocks category: blue.
As you drag and drop this block onto the "my TestLib" library name in the Libraries menu section, and it becomes a part of your library, it changes color to green; the color of your library.
NOTE:
This method of updating your library does not maintain an original UBP file.
Instead one creates a temporary UBP file by exporting the loaded library. The exported library is named the same and any new blocks are added to this file directly. Afterwards, another export needs to be done to capture the latest edits.
When completed, one has a newly updated Library, however, there is no corresponding all-inclusive UBP file. Instead, one has the latest version of the UBL file for the Library. All future updates will be done starting with this file.